
If you are someone hosting a company file over the network for real-time collaboration or boosting work management, you must set up the QuickBooks Database Server Manager to ensure a seamless multi-user network over the cloud.
QuickBooks Database Server Manager scans your company file stored on a central server or host computer. The tool acts as a gatekeeper that manages the data traffic and allows the workstations to connect with the company file over the network without even opening your QuickBooks Desktop.
If you haven’t installed Server Manager and are wondering how to set up seamless hosting, this blog is all you need. Below, we will explore how to download, install, and set up the tool to ensure seamless collaboration over the network.
QuickBooks Database Server Manager allows multiple users to access QuickBooks Desktop company files over a network. It works by hosting the company file on a server and managing communication between QuickBooks Desktop users across different systems.
The tool checks the folders where your company files are saved and prepares them for network access. This allows multiple users to open and work on the same QuickBooks file without needing to send files back and forth or create separate copies.
Now, let’s walk through how to perform the QuickBooks database server manager download, install, configure, and use QuickBooks Database Server Manager step by step so you can properly set up multi-user access and ensure your company files are shared securely and efficiently across your network.
The QuickBooks Database Server Manager is included within the QuickBooks Desktop installation package, so there is no need to install it separately.
Important: If your network uses more than one version of QuickBooks Desktop, install the oldest version first and then proceed to newer versions in sequence.
Note: QuickBooks creates a separate Windows service user during Database Server Manager installation. Make sure that this account allows permission to your company file folders to avoid connection and sharing issues.
Optional Configuration: You can skip these steps if you prefer to keep the default service settings.
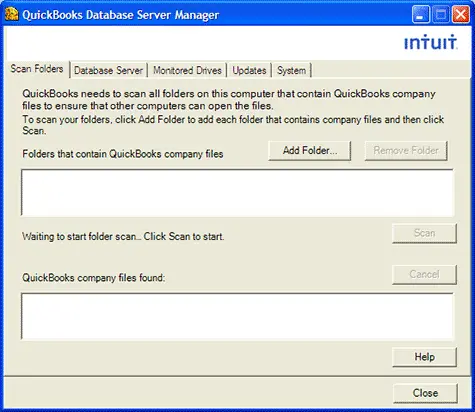
Once the Database Server Manager installation is complete, scan the folders that contain your company files. This process configures the files for network access, allowing QuickBooks Desktop users on other computers to open and work with the same company files. After the scan is finished, multiple users on your network can collaborate and access QuickBooks Desktop data simultaneously.
Before sharing your company files across the network, you must first scan the folders where they are stored. This setup step is required only once.
On the computer that hosts your company files (the server), open the Windows Start menu. Search for the Database and launch QuickBooks Database Server Manager.
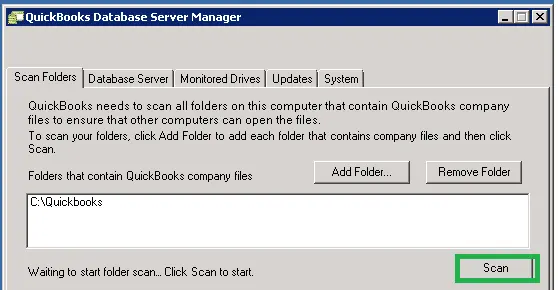
After the scan completes, the detected folders will appear under the QuickBooks company files found section. Once listed, these files become accessible to other computers connected to the same network.
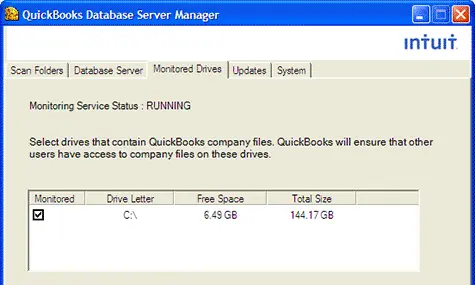
Once folder scanning is complete, the drives containing those folders will appear under the Monitored Drives section. Selecting a drive allows the system to keep track of its folders automatically, so you won’t need to run another scan if the company files are moved or updated within those locations.
There are different tabs in QuickBooks Database Server Manager that allow the multi-user connection to run smoothly.
System: The System tab lets you locate where the Server Manager is installed.
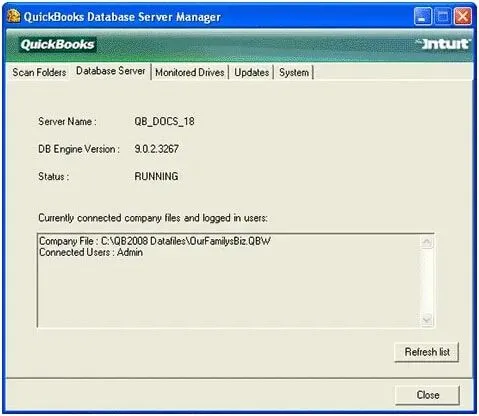
Database Server: In this tab, you can access the real-time status of the tool and the connected systems.
If your QuickBooks Database Server Manager stopped or is not available, it can prevent users from accessing company files in a multi-user environment. The troubleshooting methods below will help you identify the cause of the issue and get the Database Server Manager working again.
Restarting the Server Manager services can refresh the connection and resolve temporary issues affecting multi-user access.
While resolving the issue, it’s important to verify that the QuickBooks Database Service is running. If the service is stopped or fails to start, QuickBooks Database Server Manager may not function properly or allow workstations to access the company file.
If the QuickBooks Database Server Manager network diagnostics failed, the installation files or network components may be damaged.
Reinstalling QuickBooks Database Server Manager can replace corrupted files and restore proper communication between the server and connected workstations.
To reinstall the Server Manager, follow the detailed step-by-step instructions mentioned in the Download, Install, and Setup QuickBooks Database Server Manager section. Completing those steps will ensure the Server Manager is installed and configured properly for multi-user access.
Finally, we have reached the end of this blog, where we covered QuickBooks Database Server Manager, including its purpose, installation, setup, and how it helps enable smooth multi-user access to company files over a network. We also discussed key steps to configure and use it effectively for better data sharing and performance.
However, if you get stuck anywhere or the troubleshooting steps do not work, we recommend consulting a QuickBooks Data Service Team. Dial the +1(888)-718-7888 to connect with a certified expert and get assistance with your issue.
To configure the QuickBooks 2018 Database Server Manager, you need to install the server component, scan your company files, configure background services, and set Windows folder permissions.
You cannot manually type or change an IP address directly within the QuickBooks Database Server Manager (QBDSM) interface. Instead, QBDSM automatically binds itself to the server’s current IP address and network name.
You cannot create a data backup directly from within the QuickBooks Database Server Manager application. The Database Server Manager is exclusively designed to host and monitor multi-user network access for your company files (.QBW), not to perform administrative tasks like backups.
QuickBooks Database Server Manager (QBDBSM) doesn’t have a separate standalone download. It is included directly within the QuickBooks Desktop installer.
To connect your workstations to the QuickBooks Database Server Manager, you need to configure the server to host the company files, and then map your workstation(s) to that shared folder via the network.
Yes, the QuickBooks Database Server Manager is required to run QuickBooks in multi-user mode. It acts as the background engine that securely hosts your company file and manages the connections between your workstations and the server, preventing data conflicts.
QuickBooks Database Server Manager may stop working due to service failures, Windows Firewall blocks, corrupted configuration files, or improper multi-user hosting setups. Resolving this usually involves repairing the database services or configuring your network settings correctly.
Yes, the underlying services for QuickBooks Database Server Manager (QBDBMgrN and QBCFMonitorService) are designed to run automatically in the background on your server or host computer after they are installed. However, you must explicitly scan your company files for it to start hosting them.
To fix QuickBooks Database Server Manager scan errors, use the QuickBooks Tools Hub to automatically repair network issues. For manual fixes, ensure your Database Service is running and configured correctly in Windows.
Workstations generally fail to connect to a QuickBooks server (often throwing Error H202 or H505) because the hosting configuration is incorrect, firewall ports are blocked, or the QuickBooks Database Server Manager isn’t running properly.
