Verify and Rebuild Data in QuickBooks Desktop

A QuickBooks company file stores critical business financial information, and keeping it safe is the utmost priority of every organization. However, unexpected system shutdowns, power failures, or software crashes can sometimes damage the company file, leading to data inconsistencies, missing transactions, or unexpected errors. To help fix these issues, you can use Verify and Rebuild Data in QuickBooks Desktop.

The Verify Data utility scans your company file for data integrity issues, while Rebuild Data repairs many common forms of data damage. Running these utilities regularly helps maintain the accuracy, performance, and reliability of your QuickBooks company file.
In this comprehensive post, learn what Verify and Rebuild Data are, when and how to use them in both QuickBooks Desktop for Windows and Mac versions.

What is Verify and Rebuild Data in QuickBooks Desktop?

The Verify Data is a diagnostic tool that scans your QuickBooks company file for data damage or integrity issues. Moreover, it checks for errors that may affect reports, lists, transactions, or other accounting records.

Once the Verify Data detects any issues with the company file data, you can run the Rebuild Data utility to repair the detected data damage. This will help you regain access to a company file free from errors so that you can use it to accomplish your business tasks.

When Should You Run the Verify & Rebuild Data Tool?

The following are the instances when you can use the Verify and rebuild data tool.

  • Reports showing incorrect balances
  • Problems reconciling accounts
  • Payroll or inventory data inconsistencies
  • Missing or duplicate transactions
  • QuickBooks starts crashing unexpectedly
  • Facing error messages while opening or saving company files
  • Invoice or payment inconsistencies
  • The company file is opening or responding slowly
  • Unexpected QuickBooks shutdowns
  • Data integrity warnings

Things to Do Before Running Rebuild Data

Before running the Rebuild Data tool in QuickBooks Desktop;

  • Generate a data backup of the QuickBooks company file
  • Shut down all the unnecessary applications running in the background
  • Confirm that you are running the updated version of QuickBooks Desktop and Windows.
  • Make sure that all the users are logged out of the company file
  • Also, verify that you have proper administrator access.

How to Use Verify and Rebuild Data in QuickBooks Desktop?

Here, we have provided the step-by-step instructions to use Verify and Rebuild Data to troubleshoot and fix data damage in QuickBooks Desktop.

Step 1: Verify Your Company File Data

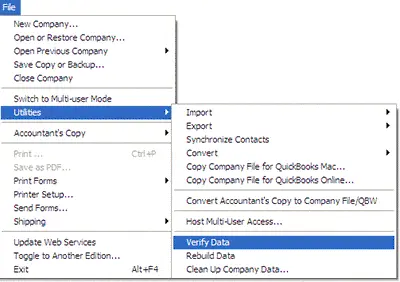
Start running the verify utility to scan your company file for errors or data damage.

  • Navigate to Windows, and click Close All.
  • Choose the File menu and select Utilities.
  • Select the Verify Data option.
Verify-and-Rebuild-data

Results You See

QuickBooks detected no problems with your dataThis message states that your data is clean, and you don’t need to do anything.
An error messageLook for the specific error message on your QuickBooks Desktop support site for the instructions on how to fix it.
Your data has lost integrityThis states that data damage was found in the file. Use the Rebuild company file data to fix it.
verify and rebuild data in QuickBooks Desktop

Step 2: Rebuild Your Company File Data

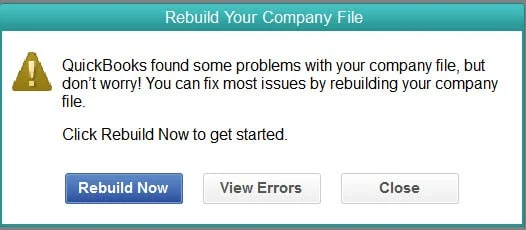
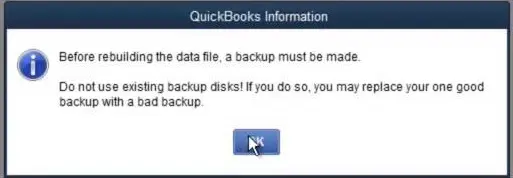
If the Verify tool detects any company file data issues, use the rebuild data to repair the damaged data. But, before running this tool, make sure to back up the company file.

QuickBooks-Information-Image

Important Tip: If you use the Assisted Payroll, connect with the experts before you rebuild your data.

  • Navigate to the File menu > Utilities > Rebuild Data.
Rebuild-Data-in-QuickBooks-Desktop
  • After this, QuickBooks will prompt you to take a backup of your company file before rebuilding it.
  • Click OK to move further.
  • Next, select the location where you have saved your backup company file and hit OK. Make sure you not replace another backup file.
  • Now, enter a new name for the backup file and tap on the Save option.
  • Finally, hit the OK option when you see the message stating “Rebuild has completed.”
Rebuild-has-completed

Step 3: Check for remaining issues

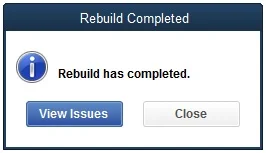
After rebuilding, verify your data again to confirm that the repair is successful.

  • Navigate to the File > Utilities > Verify Data again to test for additional damage.
  • If Verify Data detects additional issues, you have to fix them manually. Then, look for the errors in the qbw.inlog on the QuickBooks Desktop support site on how to fix it.
  • If you encounter an error that can’t be found, you can restore the recent backup. For that, browse to the File menu > Open or Restore Company.

Note: Make sure you don’t overwrite your existing company file. You have to enter the information into your QuickBooks company file again since the backup was created.

How to verify and rebuild data in QuickBooks Desktop for Mac?

Follow these steps to run the QuickBooks Verify and Rebuild Data tool in QuickBooks Desktop for Mac versions.

Verify your company file data

Before you rebuild your company file data, run the verify tool in QuickBooks Desktop for Mac. It will scan your company file for errors or data damage.

  • Choose the File > Utilities menu.
  • Click the Verify Data, and browse to the OK option to close all windows. If you notice the error message, “Your data has failed the integrity check”, you need to rebuild your file. If there are no problems with your company data, then you’re all set.

Rebuild your company file data

Once you verify your company file data, you can rebuild the company data file to fix any errors or data damage that was found.

  • Navigate to the File > Utilities.
  • Select Rebuild Data, and choose OK to close all open windows.
  • QuickBooks will give you a prompt to create a backup of your company file, and click OK. If you don’t wish to backup, tap on Cancel to continue rebuilding your company file.
    • If you haven’t set any backup preferences, QuickBooks will prompt you to update them. Click Backup Preferences and make the changes as required, and select OK.
    • Once the backup was completed, tap on Show in Finder to search for the backup. Otherwise, hit OK once you’re done.
  • When the rebuild is completed, select OK.

To ensure your company file is free from errors or data damage, you need to verify your data file again. If you still face errors or damage, rebuild the company file.

How to fix errors using transaction record numbers?

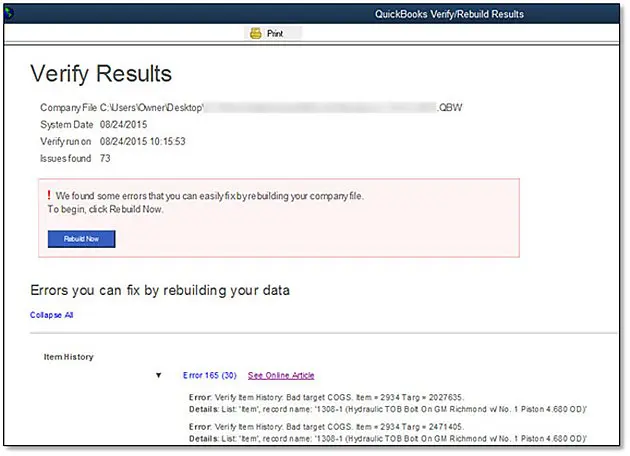
Before starting the troubleshooting, ensure to create a backup of the company file. Also, it is necessary to understand what the record numbers are. The record numbers are basically the list of errors that help you spot errors that QuickBooks determines while verifying your company file data. If it detects any errors in your file, you will get a link to open the QuickBooks.log file. Follow these steps to locate your QuickBooks.log file at any time.

  • Keep holding the Command key, choose Go, and then the Library option.
  • After this, double-click the Logs folder.
  • Now, double-click the QuickBooks.log file.

From the QuickBooks.log file

In the QuickBooks.log file, you will find internal record references such

as RecNum and RefNum. These both are both internal record numbers that are used by QuickBooks.

For example, if you notice an error stating “Verify Employee YTD Bal: ytd out of balance. Name = Dan T.Miller. Ref = 55.” The record number is 55 in this case.

  • Click Edit and choose the Find option.
  • Now, look for @recnum and mention the record number. For example: @recnum 55.
  • You will see that QuickBooks will look for all the records, including the transaction number.

If the issue still remains the same after rebuilding the company file, consider using QuickBooks File Doctor or restoring a recent backup. If neither solution resolves the problem, contact our QuickBooks Data Service team.

Fix Data Damage on QuickBooks Desktop Company File

Here, we have described how to repair your data file with the Rebuild Data tool.

  • Initially, move to the File > Utilities > Rebuild Data.
  • From the QuickBooks Information window, click OK. Then, perform the on-screen instructions to save the backup of the company file.
  • Allow the tool to repair your company data file. Wait for some time till the time it repairs the damage. QuickBooks may seem stuck, but as long as you can move the mouse, the tool will start working.
  • Once the tool completes working, hit OK.
  • Again, browse to the File > Utilities > Verify Data option.
  • Allow the tool to look for data file issues.

If QuickBooks won’t detect any issue, click OK. You can continue using your data file, and it states that you don’t have any data damage.

Manually repair company file by rebuilding your data

If you are comfortable while fixing the errors manually, you can look for the errors from the Verify Results window. Before proceeding further, make sure to create a backup of your company file.

To manually fix data errors;

  • Move to the File > Utilities > Verify Data.
  • Now, give some time to the Verify tool to scan the file for data issues.
  • When you are on the Verify Results screen, click Expand All to look for the errors.
Verify-Results-Image
  • To check for the steps to fix the error, choose See Online article. If you see that the error doesn’t have any article, connect with the support team to get help repairing your company file.

Conclusion

Verify and Rebuild Data in QuickBooks Desktop is one of the most effective built-in tools, which is used to identify and repair company file issues. Running these tools regularly helps maintain data integrity, improve software performance, and minimize the risk of financial reporting errors.
If the utilities are unable to repair your company file, consider using QuickBooks File Doctor, restoring a recent backup, or contacting QuickBooks Data Service team for advanced troubleshooting +1(888)-718-7888 .

Frequently Asked Questions (FAQ’s)

To verify your company data;

  • Open your company file, click File > Utilities > Verify Data
  • QuickBooks will scan your company file for data integrity issues. 
  • If no issues are found, you will get a confirmation message. 
  • If the tool detects any data damage or inconsistencies, run the Rebuild Data Utility to repair the issues.

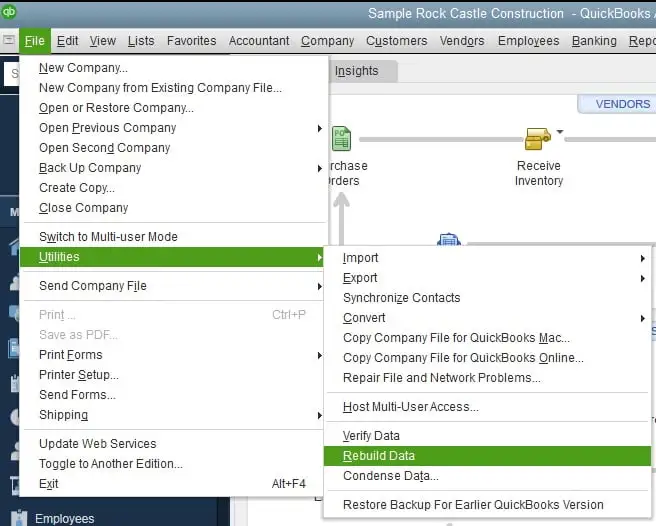
To fix company file issues with Rebuild Data, click File > Utilities > Rebuild Data, and when asked, create a backup company file. Once the repair process is completed, run Verify data to ensure that all issues are fixed. 

Try to run the Verify and rebuild data tool once again to fix the issue, as problems may sometimes require multiple attempts. If the error continues, run the QuickBooks File Doctor tool to diagnose and fix company file issues. 

You must run Verify and Rebuild data in QuickBooks desktop when you see error messages, there are missing or duplicate transactions, incorrect financial reports, or slow company file performance. 

Verify data is a built-in diagnostic utility and is used to check your company file data for damage and other inconsistencies. It doesn’t repair the data integrity issues itself. If any issues are found, you must run the rebuild data to repair your company file.  

About The Author

Steven Moody

Steven Moody is a bookkeeping and payroll specialist dedicated to helping businesses maintain accurate financial records and efficient payroll operations. His expertise includes payroll management, tax compliance, bookkeeping solutions, and financial reporting. Steven regularly shares insights on accounting best practices and business finance strategies. Outside of work, he enjoys traveling, exploring new places, and keeping up with the latest developments in business technology.

Steven Moody

QuickBooks Error

QuickBooks Script Error: Why It Happens and How to Fix It

Read More
QuickBooks Error

QuickBooks Search Not Working: How to Fix It Fast

Read More
QuickBooks Desktop

QuickBooks Payroll Tax Table Update | Get the Latest Version

Read More
QuickBooks Error

QuickBooks Company File Not Found? Here’s How to Fix It

Read More
QuickBooks Error

Intuit Data Protect Has Stopped Working? Here’s How to Fix It

Read More