QuickBooks-Email-Setup

Are you tired of downloading invoices as PDFs and attaching them manually to emails? With QuickBooks email setup, you can send invoices, reports, and other financial documents from QuickBooks using Outlook and Webmail. In this detailed guide, you’ll learn how to set up email in QuickBooks Desktop and set up QuickBooks to email invoices quickly and efficiently.

Why Do You Need to Setup Email in QuickBooks?

There are several benefits of QuickBooks Email Setup, which are discussed below.

  • You can easily send invoices and estimates directly from QuickBooks.
  • Helps improve your workflow and save time.
  • It allows you to email reports without exporting files.
  • Also, it reduces the time and effort required to share documents manually.
  • It also helps maintain professional communication with customers.

How to Setup Email on QuickBooks Desktop

Within QuickBooks, you can send transactions via Outlook or Webmail. Once you QuickBooks email Setup in Desktop, you can send invoices, reports, and more. Here are the step-by-step instructions for the smooth QuickBooks email setup process.

A. Set Up Outlook to Work with QuickBooks

Perform the steps below to setup Outlook with QuickBooks.

First Step: Connect with your ISP or email provider

You need to consult with your ISP or email provider to get the following details;
  • Username
  • Password
  • Incoming email server address
  • Incoming email server type
  • Outgoing email server address

Second Step: Set Up Outlook

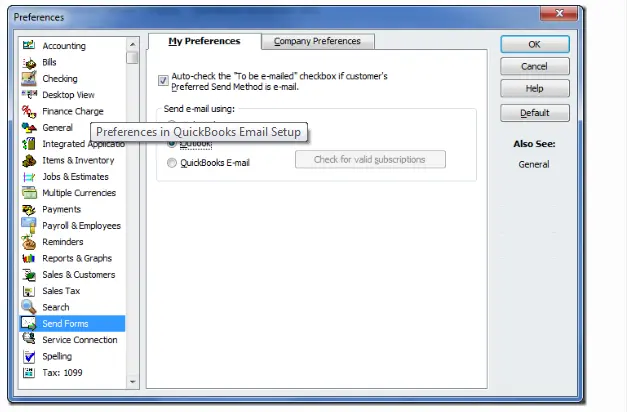
  • Navigate to the QuickBooks Edit menu.
  • Select Preferences > Send Forms.
QuickBooks-Email-Setup
  • Now, select Outlook and then click OK.

B. Set Up Webmail to Work with QuickBooks

Prerequisites before setting up email

  • Check your webmail servers and port settings with your Internet Service Provider.
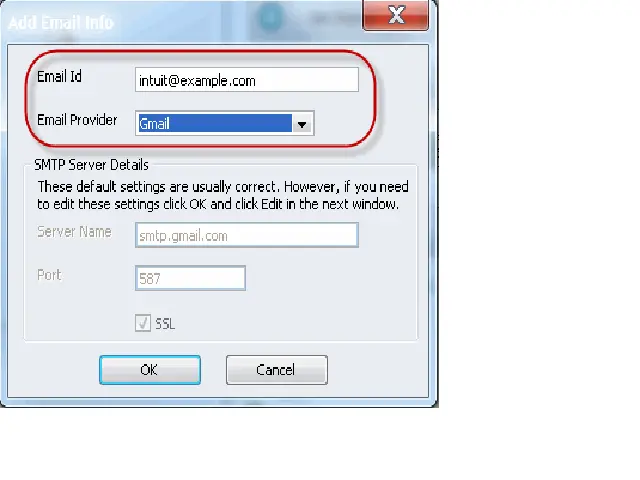
  • QuickBooks will auto-fill the information required by some of the most common providers.
Setting-up-regular-web-mail
  • Webmail providers will ask users to enable the account settings for two-step verification.

Set up Webmail

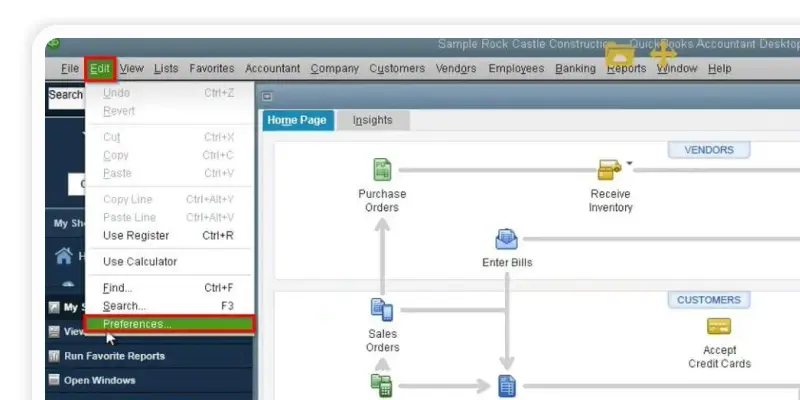
  • Navigate to Edit in QuickBooks and click Preferences.
Edit in QuickBooks and click Preferences
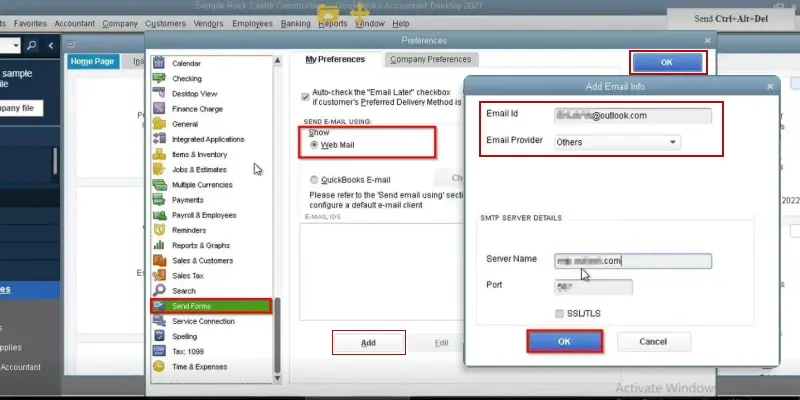
  • Go to the Send Forms option.
  • Select Webmail, then click Add.
  • Now, complete the Add Email information fields and click OK.
  • Click OK again to save your changes.

Your webmail provider’s login page will display. Sign in and select Allow to grant Intuit access.

Important Things to Remember

1. You need to log in to webmail while sending emails while using Hosted environments.
2. If your password isn’t accepted, checkout this page QuickBooks will not accept my webmail password for more information.
3. See this blog Set up enhanced security in Gmail for QuickBooks Desktop for specific Google instructions.

Internet Service Provider (ISP) and Port Information

Intuit doesn’t support providers that use the STARTTLS encryption.

1AND1.comsmtp.1and1.com587 (SSL enabled, with password)
ADELPHIAmail.adelphia.net110
AOLsmtp.aol.com465 or 587 (see Note) (SSL enabled for incoming and outgoing mail servers)
BELL SOUTHmail.bellsouth.net110
COMCASTsmtp.comcast.net587
COMPUSERVsmtp.compuserve.com
smtp.aol.com
110 or 587
COX Businesssmarthost.coxmail.com465 or 587 (see Note)
COX CENTRALsmtp.central.cox.net465 or 587 (see Note)
COX EASTsmtp.east.cox.net465 or 587 (see Note)
COX WESTsmtp.west.cox.net465 or 587 (see Note)
EARTHLINKsmtpauth.earthlink.net25 (with password)
LYCOSsmtp.mail.lycos.com25
MICROSOFT OUTLOOK 365outlook.office365.com587 (SSL enabled)
NETSCAPEsmtp.isp.netscape.com25 (SSL enabled)
PRODIGYsmtp.prodigy.net25 (SSL enabled)
ROADRUNNERsmtp-server.sc.rr.com587
SPRINT PCSsmtp.sprintpcs.com25
VERIZONoutgoing.verizon.net465
VERIZON YAHOOoutgoing.yahoo.verizon.net465

Note: If 465 doesn’t work, change the port to 587. Make sure SSL is enabled when trying both ports.

How to Setup QuickBooks to Email Invoices?

In QuickBooks Desktop, users can email sales forms, invoices, and statements to customers. Also, you can send them individually, in batches, or schedule them later. Follow the steps instructed below to set up QuickBooks to email invoices.

QuickBooks Desktop for Windows

Perform these steps to setup email in QBDT for Windows.

Email a sales form to your customer

Before starting the process, ensure that you have connected your email to QuickBooks Desktop.
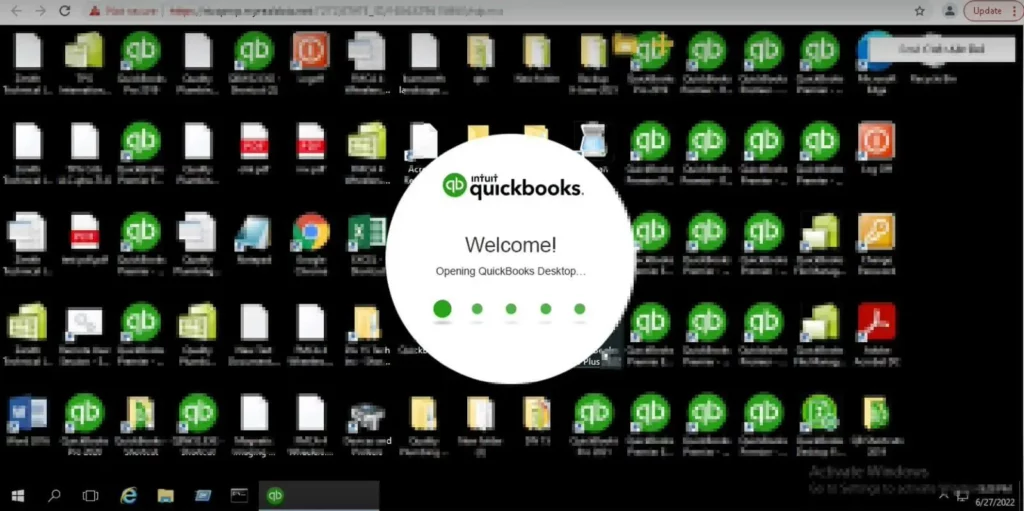
  1. Initially, open QuickBooks Desktop.
quickBooks-application-on-the-server
  1. Navigate to Customers and hit Customer Center.
  2. Look for the transactions that you wish to send through email and double-click on them to open. If you want to create a new transaction, click the New Transaction drop-down arrow.
  3. Click on Email, and QuickBooks will eventually select a template for the form you selected. Then, edit it as required.
  4. Now, pick the contact name to whom you want to send the email. If you can’t find the name on the contact list, click Add New. Then, enter the customer’s or job information.
Note:
1.
The previously used email address will be set as default the next time you email the same transaction.
2. This email address is specific to each transaction type.

Steps to manually set an email address

Here, we have provided the stepwise instructions to set an email address for a specific transaction for a customer.

  • Browse to the Customers and click Customer Center.
  • Choose a customer and click the Contacts tab.
  • After this, pick a contact and mark the checkbox for the transaction type. This will set up the contact as the default email recipient for the selected transaction type.
  • Now, go with either Save and Close or Save and New option.
  1. Now, modify the Subject field and the body of the email as required.
  2. After making all the changes, click on Send.

Email sales forms according to batch

  • After creating a sales form, click Email later before saving it.
  • Once you’re ready to send the email, choose File and then Send Forms.
  • Go through the list of forms you want to email and unmark the ones that you don’t want to send.
  • From the last window, you can also choose any other template or edit the email text as per your preference.
  • Click on Send Now.
    • Note: For sending multiple forms to a single recipient, use the following steps.
  • Choose each form you wish to send.
  • Browse to the Combine forms to a recipient in one email checkbox.
  • Lastly, choose Send Now option.

Add multiple customer contacts to your batch emails

For sending a message to multiple recipients, use the following steps.

  • Click on the To drop-down arrow. Then, choose the email addresses to include, or clear the ones to leave out.
  • In case you want to add a new email address, enter it in the Add field. However, if you have entered the incorrect email address, you will be asked to correct it.

Remove an email from the batch

Removing an email from the list only deletes the email address. However, the QuickBooks application will not remove the form itself.

  • Mark the checkbox beside the email address that you wish to remove.
  • Click Remove and then choose Remove Email option.

QuickBooks Desktop for Mac

In QuickBooks, you can email any of your forms with their attachments. While emailing, you can save the documents in PDF form, send them as email attachments, and use email tokens.

Send the form

  • Go to the form and click on the Email icon.
  • Modify the email message text of the form according to your preference.
  • Now, edit the Subject field and body of the email according to your choice.
  • Choose the email address you want to use by clicking the From drop-down arrow.
  • (Optional) Mark the Save emails as drafts in the email program checkbox. Otherwise, QuickBooks will send the email instantly.
  • If you are using QuickBooks 2020 or an earlier version and want to send an email in PDF form without text in the body, clear the Include text in emails checkbox.
  • (Optional) Once editing is complete, click Send or Save.

Send forms by batch

  • After creating a sales form, click Email later before saving it.
  • Once you are done sending emails, click File > Email Forms.
  • Now, check out the list of forms you want to email. If you want to send all the forms, choose Select All.
  • Select the Email option.
  • Furthermore, perform the following steps to email a single form.
  • Move to the File menu and click Send Forms.
  • Mark the checkbox for each form that you want to send.
  • Also, mark the checkbox next to Combine forms to a recipient in one email.
  • Click on the Send Now option.

Send a smart invoice

After saving an invoice and setting up your QuickBooks Payments preferences, you can now attach a link in the email so that your customers can pay the invoice online.

  • Choose your preferred invoice and click on the Share icon.
  • (Optional) Customize the text that your customer sees (QuickBooks uses Pay Online as the default option).

Conclusion!

Completing QuickBooks email setup allows you to send invoices, reports, statements, and purchase orders directly from QuickBooks without switching between applications. Whether you’re configuring Outlook or Webmail in QuickBooks Desktop, following the correct setup process ensures reliable email delivery. If you experience configuration issues, verify your email settings, update QuickBooks, and test your connection before contacting support +1(888)-718-7888.

Frequently Asked Questions (FAQ’s)

To set up email, 

  • Open QuickBooks and click Edit > Preferences. 
  • Choose Send Forms > My Preferences tab.
  • Now, click either Webmail or Outlook for sending emails. 
  • To link your account, follow the on-screen prompts and allow Intuit access. 

QuickBooks fails to send emails through Outlook due to a lack of admin permissions, outdated Office updates, misconfigured email preferences, or selecting a default email profile. 

If Outlook is not responding, verify your QuickBooks compatibility settings, review your Send Forms preferences, update Outlook, or temporarily switch to Webmail. 

Yes, both QuickBooks Desktop and Online support Microsoft 365 email accounts.  

To change the email account;

  • Click Edit > Preferences > Send Forms.
  • Select the email that you want to use. 
  • If you are accessing Outlook, QuickBooks will use the account that’s active in Outlook. 
  • If you’re using Web Mail, you can update the email address and settings from the same screen.

To fix the Email Not Configured or email failed issue, update your email settings in QuickBooks, or toggle your preferences in the Send Forms menu. 

If QuickBooks email is not working, disable the “Run as an administrator” settings in QuickBooks. Then, update your email preferences and repair missing Windows printing components. 

About The Author

Steven Moody

Steven Moody is a bookkeeping and payroll specialist dedicated to helping businesses maintain accurate financial records and efficient payroll operations. His expertise includes payroll management, tax compliance, bookkeeping solutions, and financial reporting. Steven regularly shares insights on accounting best practices and business finance strategies. Outside of work, he enjoys traveling, exploring new places, and keeping up with the latest developments in business technology.

Steven Moody

QuickBooks Error

What is QuickBooks Unrecoverable Error? Here’s How to Fix It

Read More
QuickBooks Error

How To Fix QuickBooks Error 15276 When Payroll Update Failed

Read More
QuickBooks

QuickBooks Running Slow? Learn How to Improve Performance

Read More
QuickBooks

QuickBooks Display Issues: Why It Happens & How to Fix It

Read More
QuickBooks Error

How to Fix QuickBooks Error H202 and Restore Multi-User Access

Read More