Getting a new computer is exciting until you remember everything that comes with it, and for most business owners, QuickBooks tops that list. Years of invoices, vendor records, payroll history, and reconciled bank feeds live inside that company file, and the idea of losing even a fraction of it is enough to make anyone postpone the upgrade indefinitely. However, to move QuickBooks to new computer is a well-established process that Intuit has built specific tools around.
When you follow the right sequence, nothing about your financial history gets left behind. This guide walks through every method available, the exact menu paths to use, what each method does and doesn’t carry over, and how to confirm your new setup is working correctly before you let go of your old computer.
3 Things to Ensure Before You Move QuickBooks to New Computer
Rushing into a migration is how files go missing. Spend ten minutes on these checks first.
Confirm your QuickBooks Version and Edition
Open QuickBooks Desktop, press F2 (or Ctrl+1 on some keyboards)
The Product Information window will display your exact product name, year, and license details.
Write this down. You’ll need it whether you’re reinstalling on the new machine or contacting support about a lost license.
Locate Your License and Product Numbers
These are in the confirmation email from your original purchase or inside your Intuit Account online. If you bought QBDT through a retailer and registered it, the numbers are tied to the registration.
Decide how many company files you actually use
Most small businesses run a single company file, but some run two or three (one for the operating business, one for a side property, one for a nonprofit board they help manage, for example). Know this number before you start, because it determines which transfer method makes sense.
Once these three things are confirmed, you’re ready to choose your method.
Choosing the Right Transfer Method for Your Situation
There isn’t one universal way to Move QuickBooks to New Computer. The right approach depends on how your business uses the software.
If you’re a single user running QuickBooks Desktop 2018 or newer on a US edition, Intuit’s built-in Migrator Tool is the fastest and most reliable option. It packages your software details and your most recent company files into a single transferable bundle.
If you’re on an older version, use QuickBooks across a network with multiple users, or you simply prefer more control over exactly which files move, the manual backup-and-restore method is the better fit. It takes a few more steps but leaves nothing to guesswork.
If you’re switching from QuickBooks Online to QuickBooks Desktop, that’s a separate process entirely (covered near the end of this guide), since QuickBooks Online doesn’t install software locally the way Desktop does.
Let’s walk through each path.
Method 1: Using the Migrator Tool (Recommended for Single Users)
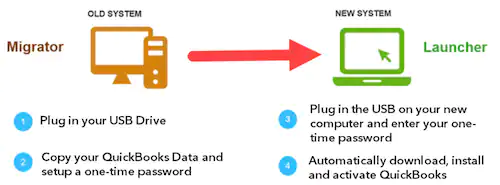
The Migrator Tool is built directly into QuickBooks Desktop and was designed specifically for this exact scenario: one person, one or a few company files, moving to a new Windows machine. It transfers the software itself along with your three most recently opened company files, so in most cases, you won’t even need to separately install QuickBooks on the new computer first.
What You’ll Need
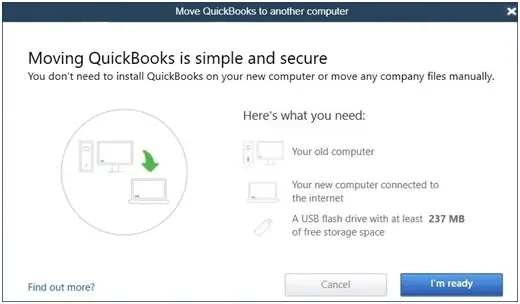
A USB flash drive with 250 MB of free space (the tool will tell you the exact amount required for your files)
Your old computer is connected to the internet.
Your new computer is running an updated version of Windows and is also connected to the internet.
Company Admin access in QuickBooks
Your license and product numbers, just in case
Step-by-Step: On Your Old Computer
Insert the USB flash drive into your old computer.
Open QuickBooks Desktop and sign in with admin credentials.
Go to File, then Utilities, then select Move QuickBooks to another computer.
Click I’m Ready, then create a one-time password. This password exists purely to protect the files while they sit on the USB drive in transit, so you’ll only need it once, immediately after this step.
Follow the on-screen prompts to select your USB drive as the destination.
Let the tool copy your files. The time this takes depends on your file size and your computer’s speed, so don’t worry if it takes a few minutes on larger company files.
When it finishes, do not unplug the drive yet. Wait for the confirmation that copying is complete.
Step-by-Step: On Your New Computer
Plug the same USB drive into your new computer.
Because of Windows security settings, the tool will not launch automatically. Open the drive manually through File Explorer.
Find and double-click the file named Move_QuickBooks.bat.
If nothing happens when you double-click it, check whether your new computer’s Windows version is fully updated. An outdated Windows build is the most common reason this step stalls.
Enter the one-time password you created earlier.
Select Let’s go and allow the tool to finish installing QuickBooks and restoring your company files.
Once it’s done, the Migrator Tool automatically deletes the QuickBooks files from the USB drive for security. Your originals are untouched on the old computer.
Important Note: Learn how to Update QuickBooks Desktop to access the latest features, security patches, and performance improvements. Keep your QuickBooks Desktop running smoothly and securely.
A Smart Habit Worth Adopting
Once the transfer is confirmed working, go back to your old computer and rename the original company file (something as simple as adding “OLD” or the date to the filename works fine). This single habit prevents the single most common post-migration mistake: accidentally opening and editing the outdated file on the old machine after you’ve already started working from the new one, which creates two versions of your books that no longer match.
What the Migrator Tool Does and Doesn’t Transfer
It matters to understand this list, because if you assume the tool grabbed everything, you will discover the gaps weeks later, usually at the worst possible time, like during tax season.
Successfully Transferred by the Migrator Tool
QuickBooks Desktop application files and version details
Your three most recently opened company files
Custom templates and forms
Memorized and scheduled reports
Local file attachments
Printer settings
Spell checker dictionary
Financial Statement Designer files (if applicable to your edition)
Cash Flow Projector and Loan Manager files
Not Transferred, and Requiring a Separate Manual Step
Multi-user network configuration
Payroll and payment service connections (you’ll need to sign back in on the new machine)
Intuit Data Protect backup settings (this needs to be uninstalled on the old machine and reconfigured fresh on the new one)
Any company files beyond the three most recently opened
Manual backup files you created yourself
If your business relies on payroll, take a moment right after migration to sign back into your payroll service inside QuickBooks on the new computer. Skipping this is a common reason people panic when their next payroll run doesn’t process as expected.
Method 2: Manual Backup and Restore (For Older Versions, Multi-User Setups, or Extra Control)
Manual method gives you flexibility that is useful if your QuickBooks version is earlier than 2018. It is also helpful if your company file lives on a shared network server accessed by multiple users, or if you simply want to handpick exactly what moves over, the manual method gives you that flexibility. It takes a bit longer, but every step is transparent and verifiable.
Step 1: Install QuickBooks Desktop on the New Computer First
Unlike the Migrator Tool, this method needs you to have QuickBooks already installed and activated on your new machine before you bring any company data over.
Download the installer from the official Intuit website, or use your installation media if you have it.
Install the same edition and year you were running on the old computer. Mismatched versions (for example, installing Premier when you were running Pro) can create compatibility friction.
Activate the software using your license and product number.
Step 2: Create a Backup on the Old Computer
Open QuickBooks Desktop on the old computer and open the company file you want to move.
Go to File, then Back Up Company, then select Create Local Backup.
Choose Local Backup, click Next, and select a save location you’ll remember, ideally your desktop or a clearly labeled folder.
Give the backup file a distinct name. Something like “CompanyName_Backup_June2026” is far easier to identify later than a generic default filename.
Let the process finish and confirm the .QBB file was created successfully.
Step 3: Transfer the Backup File
You have three practical options here:
USB flash drive: Copy the .QBB file onto the drive, then move it to the new computer.
External hard drive: Useful if your company file is unusually large.
Local network share: If both computers are on the same network, you can copy the file directly across without physical media at all.
Step 4: Restore the Backup on the New Computer
Copy the .QBB file to a local folder on the new computer (not directly from the USB drive, since restoring works best from local storage).
Open QuickBooks Desktop on the new computer.
Go to File, then Open or Restore Company.
Select Restore a backup copy, then Local backup, and click Next.
Browse to your .QBB file and select it.
Choose where you want the restored company file saved. Many users create a dedicated folder such as “QuickBooks Company Files” to keep things organized going forward.
Click Save, and let QuickBooks finish restoring.
Alternative: Copying the Entire Company Folder
If you’d rather skip the backup-and-restore cycle entirely, there’s a more direct route.
Open your company file on the old computer,
Press F2 to open the Product Information window, and look under the File Information section. This tells you the exact folder location of your company file on the hard drive.
Open File Explorer, navigate to that folder, right-click it, and select Copy.
Move the entire copied folder to your new computer using a USB drive, external storage, or a network share,
then open QuickBooks on the new machine and select Open or Restore an existing company to point directly to the copied folder.
This method preserves the file structure exactly as it was, which some users find more reliable than the backup format, especially for company files with a lot of linked attachments.
Files the Manual Method Won’t Automatically Transfer
A backup file protects your core company data, but several supporting files live elsewhere on your hard drive and need to be moved separately if you rely on them.
Custom templates and forms: These typically live in a Templates folder under your QuickBooks installation directory. If you’ve spent time designing branded invoices or estimates, copy this folder over and place it in the equivalent location on the new computer.
Memorized reports: If you have reports you run regularly with specific filters and date ranges, export them individually from the Reports menu before migrating. Then, import them on the new machine.
Loan Manager, Cash Flow Projector, and Statement Writer files: These add-on tools save their data in separate file formats outside the main company file. If you use any of them, locate the corresponding files and copy them across manually.
Intuit Data Protect: This cloud backup service needs to be uninstalled from the old computer and set up fresh on the new one. It does not migrate automatically with either method.
After the Move: Confirming Everything Works Before You Let Go of the Old Computer
Migration isn’t complete the moment the files land on the new machine. A short verification process now saves you from discovering a problem weeks later.
Open the company file and check the data. Look at your account balances, recent transactions, and customer list. Everything should match exactly what you saw on the old computer.
Run F2 again to confirm registration. On the new computer, check that QuickBooks shows as activated under your license. If it’s asking you to register again, go to Help, then Register QuickBooks, and complete the process with your phone number, postal code, and license key.
Reconnect your bank feeds. Bank connections sometimes need to be re-authenticated after a fresh installation, even though the transaction history itself is intact.
Sign back into payroll and payment services. As mentioned earlier, these don’t carry over automatically and need a fresh sign-in on the new machine.
Test printing if you use QuickBooks to print checks, invoices, or forms, send a test print to confirm your printer settings are transferred correctly. This is important, particularly if you used the manual method rather than the Migrator Tool.
Set up Intuit Data Protect again if you use it. This is because this doesn’t migrate with either method. Moreover, you will need to set up your backup schedule fresh on the new computer. Do this to make sure you’re not left without protection during the transition period.
Only after these checks come back clean, you should consider retiring your old computer. Keep that machine intact and accessible for at least a few weeks, even if everything looks fine immediately, as a safety net while you settle into normal use on the new system.
Special Case: Moving from QuickBooks Online to QuickBooks Desktop
If you’re switching from the cloud-based QuickBooks Online to QuickBooks Desktop rather than moving Desktop between two machines, the process is different because there’s no application installation to transfer, just data.
Sign in to QuickBooks Online and go to the Export Overview page.
Select Get Started, then Download Tool.
Run the downloaded installer and follow the prompts to install the dedicated migration tool.
Return to your browser and select the specific data you want to export.
You’ll receive an email containing a QBXML file once the export finishes preparing. This can take time depending on the amount of data you’re moving. Therefore, check your QBO homepage for status updates.
Open QuickBooks Desktop and remain on the No Company Open screen.
Open the installed migration tool, select Browse, and locate your downloaded QBXML file.
Select Import, give your new company file a name, and save it.
A certificate window will appear asking for permission to proceed. Select Yes, Always, check the box allowing the application to access personal data, then confirm.
Wait for the import to complete. Larger data sets can take a while, so don’t interrupt the process.
After the import is done, run a Profit and Loss report in both QB Online and QB Desktop on the same accrual basis and compare the totals. If anything doesn’t match, you can re-run the import or make manual adjustment entries to reconcile the difference.
Conclusion
To move QuickBooks to new computer feels like a bigger task than it actually is. This is mostly because the fear of losing financial data makes businesses overly cautious about a process that, in practice, Intuit has streamlined well. Whether you use the Migrator Tool for a quick single-user transfer or the manual backup-and-restore method for more control, the key to a clean migration isn’t speed, it’s the sequence.
You need to confirm your license details first. Then, choose the method that matches your actual setup. After that, transfer the supporting files the main tools tend to miss. Finally, verify everything on the new machine before retiring the old one. Do it in that order, and your new computer will run QuickBooks exactly the way your old one did, just faster, and without a single invoice or reconciled transaction left behind.
If you run into any challenges during the transfer process or need expert assistance, contact Data Service Team at +1(888)-718-7888. Our QuickBooks specialists can help ensure a smooth, secure, and hassle-free migration to your new computer.
Frequently Asked Questions (FAQ’s)
Moving your company file or reinstalling the software does not use up or invalidate the QB license. The license is tied to your Intuit account and product number, not to a specific machine. However, each separate active installation typically requires its own license if you intend to keep both running simultaneously.
Check your original purchase confirmation email, or sign in to your Intuit Account online, where purchased licenses are usually listed. If neither works, Intuit’s customer support can look up your license using the email address tied to your purchase.
Not necessarily, unless you’re on a version older than 2018 or running a multi-user network setup, in which case uninstalling from the old machine before installing fresh elsewhere is part of the standard process. For single users on 2018 or newer using the Migrator Tool, the original installation can remain in place, though renaming the old company file is strongly recommended to avoid confusion.
About The Author
Steven Moody is a bookkeeping and payroll specialist dedicated to helping businesses maintain accurate financial records and efficient payroll operations. His expertise includes payroll management, tax compliance, bookkeeping solutions, and financial reporting. Steven regularly shares insights on accounting best practices and business finance strategies. Outside of work, he enjoys traveling, exploring new places, and keeping up with the latest developments in business technology.