Have you entered the wrong inventory quantity in QuickBooks or accidentally created the same adjustment twice? Such mistakes can affect your inventory records and make it difficult to track the actual stock available. Regular accounting and bookkeeping services can also help businesses maintain accurate financial records and identify discrepancies. In this situation, you may need to delete an Inventory Adjustment in QuickBooks to correct the incorrect entry and keep your records accurate.
Don’t worry! Fixing these mistakes is easier when you know the right steps. In this guide, we’ll explain how to delete, edit, or reverse inventory adjustments in QuickBooks Online and Desktop. We’ll also discuss common issues and useful tips to help you manage your Inventory properly.
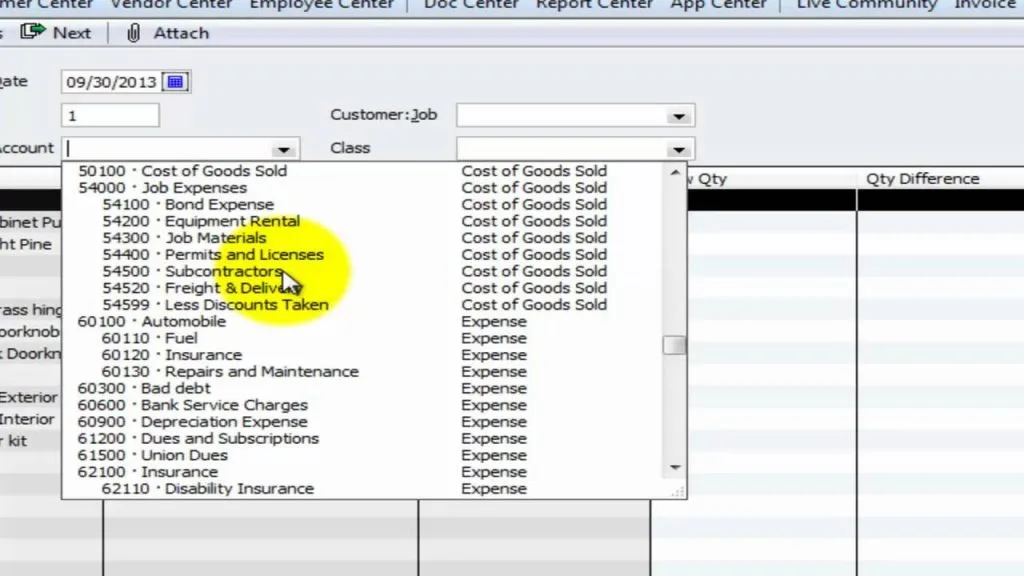
An inventory adjustment in QuickBooks is used to correct the quantity or value of products available in your stock. It helps you update inventory records when the actual stock does not match the quantity shown in QuickBooks.
For example, if QuickBooks shows 100 products but you have only 90 in stock, you can record an inventory adjustment to correct the difference. You can also use adjustments to record damaged, lost, or missing products.
A QuickBooks inventory quantity adjustment helps you update the recorded stock when the actual physical quantity differs from the quantity available in your accounting records.
These adjustments help you keep your inventory records accurate and ensure your financial reports reflect the correct stock value. If you want to learn more about managing your stock, check out Intuit’s guide on how to set up and track inventory in QuickBooks Online.
If incorrect inventory entries have accumulated over time, consider reviewing your records as part of a QuickBooks messy books cleanup process. This can help identify discrepancies and improve the accuracy of your financial reports.
Sometimes, you may need to delete an inventory adjustment in QuickBooks to correct mistakes and keep your stock records accurate. Here are some common reasons:
Before deleting any adjustment, check its details carefully. Removing an entry can change your inventory quantities, values, and financial reports.
Before you remove an inventory adjustment in QuickBooks, check the transaction details carefully to ensure that it is incorrect or duplicated. If your company file contains damaged or inconsistent records, consider exploring QuickBooks data repair services to identify and address potential data-related problems before making further changes.
If you’ve entered an incorrect inventory adjustment in QuickBooks Online, you can delete it by locating the transaction and removing it from your records. Before deleting it, make sure you’ve selected the correct adjustment because this action can affect your inventory quantities and financial records.
Before you delete an inventory adjustment in QuickBooks, identify the incorrect transaction and review its date, inventory item, and quantity to avoid removing the wrong entry.
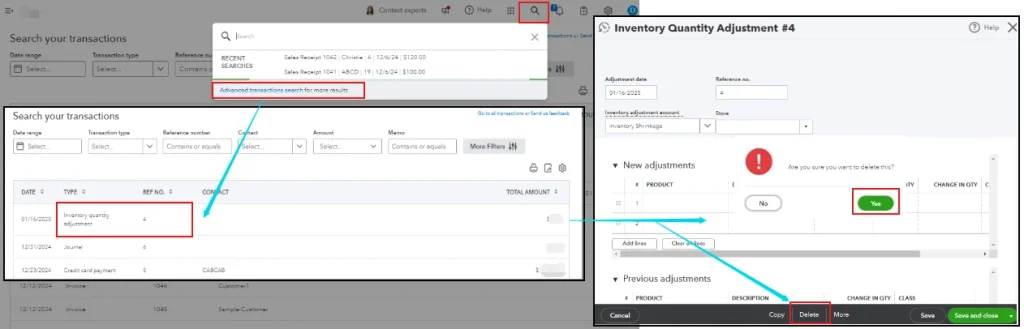
Follow these steps to delete an inventory adjustment in QuickBooks Online:
Open QuickBooks Online and sign in using your account credentials.
After completing these steps, review your inventory quantities and values to ensure your records are correct.
Suppose you’re using QuickBooks Desktop and have entered an incorrect or duplicate inventory adjustment. Here are the simple steps to follow:
Before handling a Delete an Inventory Adjustment in QuickBooks, review the transaction date, inventory item, and quantity to make sure you have selected the correct entry.
Launch QuickBooks Desktop and sign in to your company file using an account with the required permissions.
You can also try the Ctrl + D keyboard shortcut while the adjustment is open.
If QuickBooks Desktop doesn’t show the delete option, you can create a reversing inventory adjustment instead.
After completing the correction, go to Reports, choose Inventory, click Inventory Valuation Detail, and review the updated inventory quantities and values.
This will help you ensure your QuickBooks inventory records remain accurate. If you notice unusual company file behavior or inconsistencies in your records, you can also learn how to verify and rebuild data in QuickBooks Desktop to identify and address certain data integrity issues.
Sometimes, Delete an Inventory Adjustment in QuickBooks is not possible or may not be the best option. In such cases, you can reverse the incorrect adjustment by recording another adjustment with the opposite quantity difference.
You can reverse inventory adjustment in QuickBooks by recording a new adjustment with the opposite quantity difference when deleting the original transaction is not appropriate. Here are the steps to follow:
After saving, check the Inventory Valuation Summary and Inventory Stock Status by Item reports to confirm that the correction has been recorded properly.
If you have entered incorrect information in an inventory adjustment, you may want to correct it instead of creating another transaction.
To edit inventory adjustment in QuickBooks Desktop, first check whether your installed version allows you to modify the original adjustment. To review and correct an adjustment, follow these steps:
This approach helps you correct inventory records without assuming that every Desktop version supports direct editing or deletion.
If an inventory adjustment contains an incorrect quantity, date, or adjustment account, you can edit the existing transaction in QuickBooks Online.
To correct inventory adjustment in QuickBooks Online, locate the original transaction and review its details before making the necessary changes. Here’s how:
Before saving, double-check the item quantities and adjustment details. This will help you avoid creating another inventory discrepancy.
Sometimes, you may search for an inventory adjustment but cannot find it in QuickBooks. This can happen because of incorrect search filters, account selection, transaction dates, or other record-related issues.
Here are some simple things you can try:
Make sure you have selected Inventory Quantity Adjustment in Advanced Search. Choosing the wrong transaction type can prevent the required record from appearing.
Check whether your search filters include the date when the adjustment was originally created. Expand the date range if necessary.
Make sure you have selected the correct account. An incorrect account filter may hide the transaction from your search results.
If you manage multiple companies, confirm that you are signed in to the correct QuickBooks company.
Remove unnecessary filters and search again. Sometimes, a specific filter can prevent QuickBooks from displaying the transaction you need.
If you are still unable to find the adjustment, you can open the relevant inventory reports and review the affected items and transactions.
After deleting or reversing an inventory adjustment, it is important to check whether your inventory records are correct. Follow these simple checks:
In QuickBooks Desktop, you can use the following reports:
If the quantities or values do not match your records, investigate the difference before making another adjustment. You can also learn how to use inventory reports in QuickBooks to review stock quantities, inventory values, product sales, and items still on order. Along with reviewing inventory reports, businesses should regularly perform QuickBooks bank reconciliation to compare recorded financial transactions with bank statements and identify discrepancies.
Make QuickBooks Work Smarter for Your Business
Spend less time managing data and more time growing your business. Whether you need help setting up QuickBooks, cleaning up your books, reconciling accounts, or resolving errors, our team is here to make accounting easier. Get quick solutions that save time, improve accuracy, and keep your business finances on track.
Knowing how to Delete an Inventory Adjustment in QuickBooks can help you fix incorrect quantities, duplicate entries, and other inventory mistakes. Before deleting any transaction, check its details and make sure it is the right step. If deletion is not available, you can edit or reverse the adjustment, depending on your QuickBooks version. Finally, review your inventory reports to ensure your stock quantities and values are correct. This will help you maintain accurate records and manage your inventory without confusion. Regular QuickBooks tax season cleanup can also help businesses organize their financial records and prepare for tax reporting.
Need help deleting or correcting an inventory adjustment in QuickBooks? Contact Data Service Team today at +1(888)-718-7888 and get step-by-step guidance.
Open Advanced Search and select Inventory Quantity Adjustment. Find the transaction you want to remove, open it, and select Delete. Confirm the deletion after checking its details.
Yes, QuickBooks Online allows you to delete an inventory quantity adjustment. Use Advanced Search to find the transaction and remove it after verifying the details.
Open your company file and locate the inventory adjustment. Check whether your Desktop version provides a deletion option. If deletion is unavailable, you may need to record a reversing adjustment.
Deleting an adjustment changes the recorded inventory quantities and may affect inventory value and related account balances. Always review your inventory reports after deleting a transaction.
Find the incorrect adjustment and check whether you can edit it. If editing is unavailable, create a new adjustment with the correct quantity or reverse the original entry.
Yes, you may be able to edit an existing adjustment if your QuickBooks version supports it. Open the transaction, update the incorrect details, and save your changes.
Create a new adjustment for the same inventory item with the opposite quantity difference. For example, if the original adjustment increased stock by 10 units, enter a decrease of 10 units.
The Delete option may be unavailable because of your QuickBooks version, user permissions, or transaction details. If you cannot delete it, consider recording a reversing adjustment after consulting your accountant.
Yes, deleting an adjustment can change inventory quantities, inventory asset balances, and related expenses. It may also affect your financial reports, so review the updated records carefully.
In QuickBooks Online, use Advanced Search and select Inventory Quantity Adjustment to find incorrect entries. For deleted transactions, check the Voided/Deleted Transactions report where available.

Get Free Consultation for QuickBooks Upgrade
(2021, 2022, 2023)