Intuit Data Protect Has Stopped Working

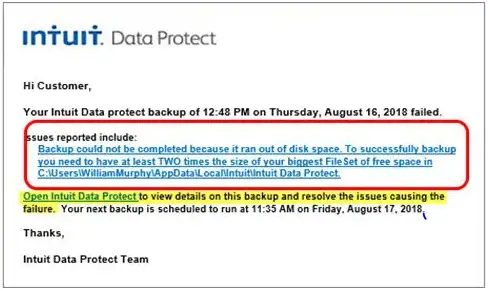
Maintaining regular backups of your QuickBooks company file is important to protect confidential business data from possible loss, file corruption, or system failures. However, while creating or scheduling a backup, you may encounter the Intuit Data Protect Has Stopped Working error. It prevents your backups from completing successfully. In some cases, you may also receive an error message stating:

“Intuit Data Protect Backup Failed: Firewall or connection issue.”

Intuit Data Protect Has Stopped Working

This issue may occur due to outdated Windows components, firewall or antivirus restrictions, corrupted Intuit Data Protect services, network connectivity issues, or compatibility conflicts. As a result, Intuit Data Protect may freeze, crash unexpectedly, stop responding, or fail to create automatic backups, leaving your QuickBooks company data at risk if the issue isn’t resolved.

In this guide, you’ll learn the most common causes of the Intuit Data Protect Has Stopped working error, along with step-by-step troubleshooting methods to restore backup functionality.

Common Symptoms of the “Intuit Data Protect Isn’t Working” Error

The following are the common symptoms that you may notice when you run into the Intuit Data Protect has stopped working error. Let’s have a look at all those symptoms for better understanding.

QuickBooks-IDP-Not-Working
  • You will notice that the IDP icon is missing from the taskbar.
  • Fails to start the IDP automatically.
  • Scheduled Intuit Data Protect has stopped working.
  • You may face a login error while running the IDP to create a backup.
  • Backup failures due to an unstable or faulty internet connection.
  • While generating the backup using IDP, Error 305 appears.
  • The IDP backup fails due to the blockage of Windows Firewall and Internet settings.

Understanding Why Intuit Data Protect suddenly stop working

The Intuit Data Protect has stopped working issue can occur due to an outdated Intuit Data Protect or QuickBooks Desktop version. It can also occur due to other factors, such as:

  • Windows Firewall or an antivirus program might block Intuit Data Protect from generating the backup.
  • Another major cause can be insufficient storage space (RAM) to create a backup of the company data.
  • Damaged or corrupt Windows components.
  • Intuit Data Protect backup issue may occur if the IBuEngHost.exe file isn’t running on the admin user’s account.
  • A fault in the network connection may also create issues while generating data backup.
  • If you haven’t added Intuit Data Protect as a trusted website in your web browser.
  • It could also be caused by a damaged or corrupt Microsoft .NET Framework.

Best Practices to Prevent the Intuit Data Protect has Stopped Working Error

Consider the following tips to prevent the “Intuit Data Protect has stopped working” error to ensure a smooth backup process. These are:

  • Always keep your operating system and Microsoft components like .NET Framework updated to the latest version.
  • Ensure your system has sufficient free disk space and available memory (RAM) for backup operations.
  • Keep QuickBooks Desktop and Intuit Data Protect updated to their latest versions.
latest-quickbooks-desktop-update
  • Verify that your QuickBooks company file is free from corruption before creating backups.
  • A valid and updated Intuit Data Protect subscription is mandatory.

Note: Facing sudden crashes or freezes? When QuickBooks has stopped working, it usually points to damaged company files, outdated software, or system conflicts—here’s how to fix it fast.

Proven Methods to Fix the “Intuit Data Protect has stopped working” error

Now that you understand the common causes and symptoms of the Intuit Data Protect Has Stopped Working error, it’s time to resolve the issue and restore your backup functionality. Below, we’ve outlined proven troubleshooting methods to help you fix the problem and resume automatic backups.

Solution 1: Ensure Windows Firewall isn’t blocking IDP

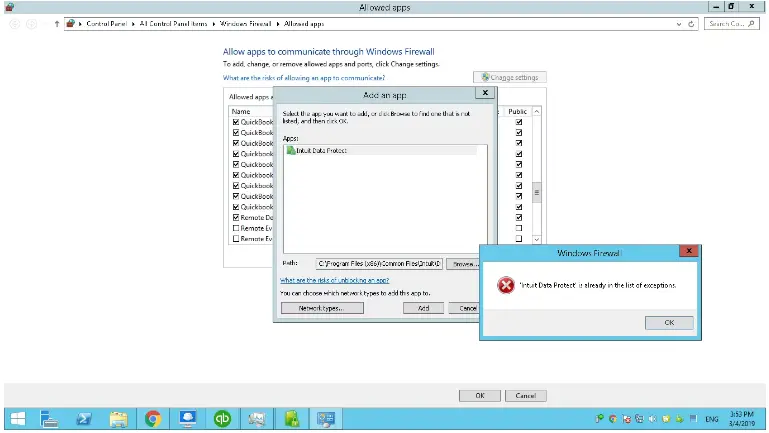
To run the Intuit Data Protect for generating the backup, proper firewall access is required. Otherwise, it might run into the IDP not working issue. Therefore, to fix the issue, add important files to the Windows firewall using the steps given below.

  • Open the Start menu, type “Firewall,” and open Windows Firewall.
Windows-Firewall
  • Choose Allow an app through Windows Firewall, and click Allow another app.
  • Click Browse and browse to Program Files (x86) > Common Files > Intuit > Intuit Data Protect.
  • Navigate to QBEDPService.exe > Open > Network Types.
  • Tick the Private checkbox and click Add.
  • Repeat steps 4 and 5 for the IBUenghost.exe and IntuitDataProtect.exe files. If you receive a message that says the file already exists, you’re all set.
intuit-data-protect
Important Tip: Sometimes, the third-party software installed on your system can block these important files. So, ensure these files are allowed. You can use the software maker to do so.

Solution 2: Confirm IBuEngHost.exe isn’t running as a Windows user

Ensure that the IBuEngHost.exe process runs as a system user for the smooth working of the Intuit Data Protect feature.

Ensure that the file is running as System

  • Go to the Taskbar, right-click on it, and choose Start Task Manager.
  • Click the Details tab and search for the IBUEngHost.exe file. Confirm the following settings.
  • Username: System
  • Status: Running

If IBuEngHost.exe isn’t running as System, perform these steps,

  • First, download a new installer for your QuickBooks version.

Note: Save the downloaded setup file to an easy-to-find location.

  • Browse to the location where you saved the installer.
  • Find and right-click the installer and choose Run as Administrator.
  • Continue further with the reinstallation.
  • Once the installation is completed, search for IBuEngHost.exe from the task manager again. Check that the status is Running and the user name is System.
  • Finally, run the back up again using Intuit Data Protect. If the error continues, move to the next solution.

Solution 3: Run the Intuit Data Protect Diagnostic Tool

Intuit Data Protect Diagnostic is a great tool that checks your computer’s memory, disk space, Windows components, such as .NET Framework, and IDP version. Also, it tests whether you are able to connect with the backup server. Perform the following steps to run the IDP Diagnostic tool and fix the issue.

  • Locate and right-click the Intuit Data Protect icon.
  • Choose About Intuit Data Protect. You will notice that the icon will look like a green padlock.
  • Now, hit Ctrl + F2 keys on your keyboard to open the Intuit Data Protect Diagnostic tool.

Note: If Ctrl + F2 doesn’t work, use the Fn + Ctrl + F2. Otherwise, use the On-Screen Keyboard.

  • Click on the Run Diagnostics.
  • Next, if the tool detects an issue with a firewall or third-party security software, you need to reconfigure the software or hardware to give access to IDP files.
  • To get more details regarding the configuration of your security software/hardware, go to your manufacturer’s website and add the following exceptions.
C:\Program Files(X86)\Common Files\Intuit\Data Protect\IntuitDataProtect.exe
C:\Program Files(X86)\Common Files\Intuit\Data Protect\IbuEnghost.exe
C:\Program Files(X86)\Common Files\Intuit\Data Protect\QBIDPServices.exe

Solution 4: Add Windows Firewall Ports

Ensure the following Windows Firewall ports are added to run Intuit Data Protect smoothly. Follow the steps below to add the Firewall ports.

  • Click Start menu, type Control Panel, and open Control Panel.
  • Choose System and Security > Windows Firewall > Advanced Settings.
  • Click Inbound Rules from the left side of the Advanced window. Select New Rule from the right side of the window.
  • Now, add the following ports and tap on Next.
    • Incoming Port: 80
    • Outgoing Port: 443, 16841

Note: You need to add HTTP ports 80 and 443 for connecting IDP to the internet. If you are able to use the internet and can log in to secure

  • websites, IDP should work.
  • Follow the on-screen prompts to move ahead.
  • At last, follow steps 1-4 for creating Outbound Rules.

Solution 5: Add Intuit as a Trusted Website

Adding Intuit websites to your browser’s trusted sites can help Intuit Data Protect communicate securely with Intuit servers.

  • Open Internet Explorer and move to the Tools > Internet Options.
  • Browse to the Security tab and unmark the Enable Protected mode checkbox.
  • Choose Trusted Sites and click Sites.
  • Unmark the checkbox of “Require server verification (https:) for all sites in this zone”.
  • Now, add the following URLs and click Close.
    • *.backup.com
    • *.intuit.com
    • *.intuit.net.
  • Move to the Privacy tab and choose Sites.
  • Similarly, add the following websites to the Address of Website box.
    • *.quickbooks.com
    • *.intuit.com
  • Once all the changes are done, click OK for the confirmation.

Solution 6: Check that Intuit Data Protect & QuickBooks Desktop are updated

Regularly checking and updating the QuickBooks Desktop and Intuit Data Protect versions are important for proper functioning, authentication, and general reliability.

Steps to update Intuit Data Protect

Note: If you are using IDP, click on its icon and choose About Intuit Data Protect. Then, see if you are using the latest version i.e, 1.70.21.5009. If it’s not updated, then download and install the latest one.

Step 1: Download the latest update for Intuit Data Protect

  • Navigate to the Help menu and click Update QuickBooks.
  • Choose the Update Now tab.
  • Verify that you have selected Data Protect from the list of options and click Get Updates.

Step 2: Install the update

  • Click on the up arrow on your desktop toolbar. It is located at the lower-right corner beside the clock.
  • Right-click on the Intuit Data Protect icon and click About Intuit Data Protect. The icon looks like a green padlock.
  • Choose the Update option.
  • Once it’s finished, click OK.

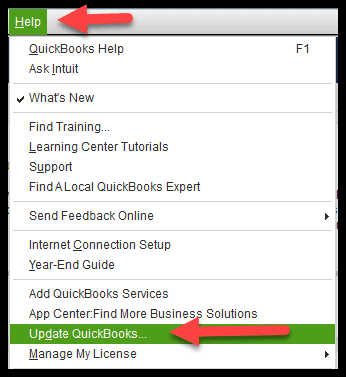
Steps to update QuickBooks Desktop manually

Check for the latest release
See if your QuickBooks software is updated to the latest version.

  • First, open the QuickBooks Desktop.
  • Now, press F2 (or Ctrl + 1) to open the Product Information window.
  • Look for your current version and release number.
  • At last, compare it with the latest available release:
    • QuickBooks 2024 R21_50

Here’s how to update QuickBooks Desktop

  • Exit from the QuickBooks Desktop.
  • Visit the Downloads & Updates page and click Standard Setup.
  • Choose your Country, Product, and Version (Year).
  • Click on the Search option and select Get the latest updates.
  • Now, open the downloaded file to install the update.
  • Finally, restart your computer after installation.

Conclusion

The Intuit Data Protect has stopped working error may disrupts the backup and put your valuable QuickBooks data at risk. Fortunately, the issue is usually caused by firewall restrictions, outdated software, damaged Windows components, or incorrect system settings. By following the above solutions, you can easily fix this issue.

If the problem continues after performing these troubleshooting steps, consider reinstalling Intuit Data Protect. Otherwise, contact our QuickBooks Data service team for better guidance +1(888)-718-7888.

Frequently Asked Questions (FAQ’s)

Yes, you can use QuickBooks Data protect on multiple computers if they are linked with a same licensed QuickBooks account. Make sure that every computer has installed IDP installed is configured properly to creta the backup. 

Follow these steps to recover lost QuickBooks data;

  • Move to File menu > Open or Restore Company > Restore a Backup Copy
  • Choose Local Backup or the backup you created with IDP. 
  • Browse to the company file and use the on-screen steps to complete the backup.

QuickBooks Data Protect not working due to outdated software, damaged Windows components, improper internet connection, firewall or antivirus restrictions. 

To fix QuickBooks Data Protect not working issue,

  • Update QuickBooks Desktop and Intuit Data Protect. 
  • Run Intuit Data Protect Diagnostic tool
  • Check your internet connection. 
  • Add Intuit as a trusted website in your browser.

The common causes behind QuickBooks Data Protect backup errors includes, outdated QuickBooks or IDP, insufficient disk space, damaged Microsoft .NET Framework components, and corrupted Windows system files.

Before fixing QuickBooks Data Protect not working issue check;

  • Intuit Data Protect subscription i active and valid. 
  • Update QuickBooks Desktop or Intuit Data protect
  • Allow required files and ports through Windows Firewall. 
  • Repair the Microsoft .NET Framework if required. 

To repair backup issues on Windows 10 and Windows 11;

  • Install the Windows updates. 
  • Repair your .NET Framework components. 
  • Restart Intuit Data Protect service.
  • Make sure that QuickBooks Desktop and IDp is updated to the latest version. 

About The Author

Steven Moody

Steven Moody is a bookkeeping and payroll specialist dedicated to helping businesses maintain accurate financial records and efficient payroll operations. His expertise includes payroll management, tax compliance, bookkeeping solutions, and financial reporting. Steven regularly shares insights on accounting best practices and business finance strategies. Outside of work, he enjoys traveling, exploring new places, and keeping up with the latest developments in business technology.

Steven Moody

QuickBooks Error

QuickBooks Company File Not Found? Here’s How to Fix It

Read More
QuickBooks Error

QuickBooks Outlook is not responding? Try These Proven Methods

Read More
QuickBooks

How To Fix QuickBooks Hosting Mode is Off in Multi-User Mode

Read More
QuickBooks

What is QuickBooks? Features, Updates & Pricing You Need to Know

Read More
QuickBooks Desktop

QuickBooks Has Stopped Working? Here’s How to Fix It Fast

Read More