QuickBooks-Hosting-Mode-is-Off

Does the “QuickBooks hosting mode is off’ error prevent you from accessing the company file in Multi-user mode, causing delays in business operations?

If yes, this usually happens when your system isn’t configured correctly to host the company file in multi-user mode. As a result, it restricts workstations’ access, disrupts collaboration, and may trigger errors when switching to multi-user mode.

In this comprehensive guide, we have explained the causes of the “QuickBooks Hosting mode is off” error and provided useful solutions to fix it effectively.

Want to experience QuickBooks hosting before you commit? Contact Data Service Team for a free demo and discover secure, high-performance QuickBooks Enterprise Hosting at a budget-friendly price.

What does ” QuickBooks Hosting Mode Is Off” Indicate?

The hosting mode in QuickBooks allows a server computer to host the company file, enabling multiple users to access it from different locations at the same time.

If the hosting mode is turned off, it indicates that your computer is not configured properly to host the company file with other workstations. As a result,

quickbooks-hosting-mode
  • You might face issues while accessing the multi-user mode feature.
  • You may encounter hosting or network-related errors.
  • QuickBooks may fail to switch to multi-user mode.
  • Other computers can’t open the company file.

Causes of QuickBooks Hosting Mode is Off Error in Desktop

The following are the major factors that may trigger the QuickBooks hosting mode off issue.

Windows Firewall
  • Hosting mode is disabled on the server.
  • Windows Firewall is blocking the communication between the server and workstations.
  • Another possible cause is that the workstations won’t be able to connect to the server due to network issues.
  • Multiple workstations are trying to host the company file.
  • QuickBooks Database Server Manager isn’t working properly.
  • Incorrect multi-user configuration.
  • Problems with the installation or update of QuickBooks Desktop.
QuickBooks Hosting Mode is off

Proven Solutions to Resolve the QuickBooks Enterprise Hosting Mode is Off Error

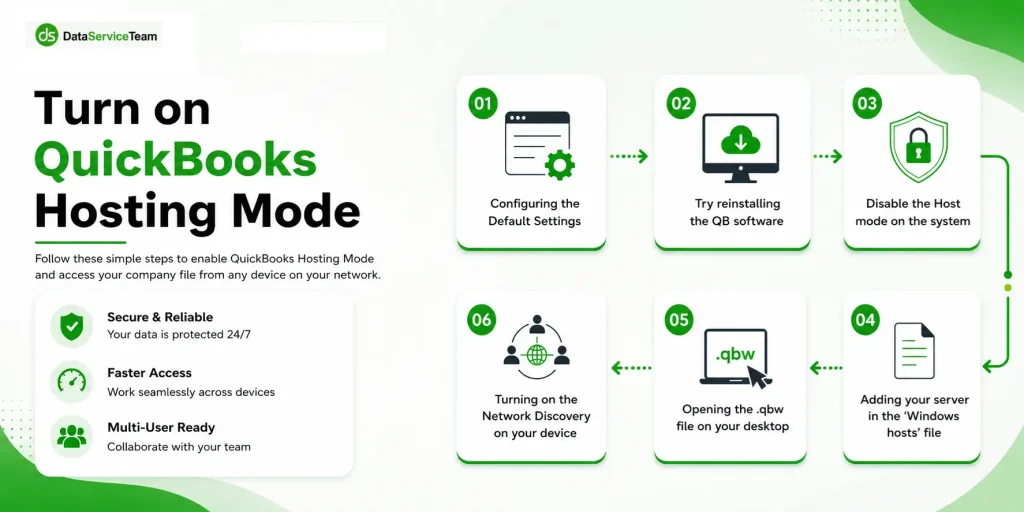
If the QuickBooks Hosting Mode is Off in your system, then perform the following troubleshooting methods to fix the issue.

Solution 1: Rename .ND and .TLG Files

a. Renaming the Network Data & Transaction Log File

Corrupted or damaged QuickBooks Network Data (.ND) and Transaction log (.TLG) files can prevent multi-user mode and may cause a hosting mode error QuickBooks.

When you rename both these files, QuickBooks automatically recreates them when you reopen the company file or scan the company files using the QuickBooks database server manager. Follow these steps to rename the files;

  • Go to the company file folder. You will locate this file in the default location.
    • C:\Users\Public\Public Documents\Intuit\QuickBooks\Company Files
  • Locate .ND and .TLG files from the company file folder.
  • Now, right-click on .ND/.TLG file and select Rename.
  • Rename the file names by adding .OLD at the end of these file names.
  • Once you rename the .ND/.TLG files, open QuickBooks.

b. Run the QuickBooks Database Server Manager

If the QuickBooks Database Server Manager isn’t configured correctly, it prevents you from sharing your company file with other workstations over the network. Thus, it might cause the QuickBooks Database Manager hosting mode is off error. So, to fix the issue, follow these steps to run the QBDBMgrN properly.

  • Before starting the process, download and install the latest version of QuickBooks Tool Hub.
  • In the QB Tool Hub, from the left menu bar, click Network Issues.
  • Choose QuickBooks Database Server Manager. Then, install QuickBooks if you haven’t already install them.
  • Now, click Start Scan when you find .ND and .TLG files. If you can’t find the files, hit Browse to locate the file and choose Start Scan.
  • Finally, start QuickBooks and try to log in to your company file again.

Solution 2: Run QuickBooks File Doctor Tool

The QuickBooks File Doctor tool from the tool hub is used to fix the damaged or corrupt company file. Use the following steps to run this tool and repair the damaged file to fix the QuickBooks file doctor hosting mode is off error.

  • Open the QB Tool Hub and then select Company File Issues.
  • Navigate to Run QuickBooks File Doctor and wait for the tool to run.
  • Choose your company file by clicking the drop-down arrow. If you can’t find the file, hit Browse and search to find the file.
  • Now, hit Check your file and click Continue.
  • Mention the QuickBooks admin password and tap on Continue to finish the process.

Solution 3: Check Folder & Windows Access Permissions

Incorrect folder permissions can prevent QuickBooks from accessing the company file and may trigger hosting-related issues. Follow these step-by-step instructions to set up a folder and Windows access permissions to rectify the QuickBooks hosting mode is off issue.

a. Set Up Folder Permissions

Start the process by checking that the permissions are set accurately.

  • Navigate to the Start menu and launch File Explorer.
  • From the Fie Explorer, locate and right-click on the QuickBooks company file folder. Then, click Properties.
  • Select Advanced from the security tab.
  • Browse to the QBDataServiceUserXX and tap on Edit.
  • Now, verify that the following options are set to Allowed: Traverse Folder/Execute File, List Folder/Read Data, Read Attributes, Read Extended Attributes, Create Files/Write Data, Create Folders/Append Data, Write Attributes, Write Extended Attributes, and Read Permissions.

If your permissions aren’t configured properly, apply the following steps.

  • Locate the folder that contains your QuickBooks company file, then right-click it and select Properties.
  • Open the Security tab and click Edit to modify the folder permissions.
  • Select QBDataServiceUserXX (where XX represents your QuickBooks version) from the list of users.
  • Under the Permissions section, check the Allow box next to Full Control.
  • Click Apply, then select OK to save the changes.
  • Close the Properties window and reopen QuickBooks to verify whether the hosting issue has been resolved.

b. Change Folder Permissions

Use these steps to change your folder permissions accurately.

  • Go to the desktop, click on the Start menu, and launch File Explorer.
  • Now, locate and right-click on the following folders.
C:\Program Data\Intuit\Entitlement Client\v8
C:\Program Data\Intuit\Entitlement Client\v6.0
C:\Program Data\Intuit\Entitlement Client\v5
C:\Program Data\Intuit\Entitlement Client\v3
C:\Program Data\Intuit\Entitlement Client
C:\Program Data\Intuit\QuickBooks Enterprise Solutions X.0 (X = version) or C:\Program Data\Intuit\QuickBooks 20XX (XX = year)
C:\Program Data\COMMON FILES\INTUIT
C:\Program Data\COMMON FILES\INTUIT\QUICKBOOKS
C:\Users\Public\Public Documents\Intuit\QuickBooks\FAMXX (XX = year)
C:\Users\Public\Public Documents\Intuit\QuickBooks\Company Files
C:\Users\Public\Public Documents\Intuit\QuickBooks\Sample Company Files\QuickBooks Enterprise Solutions X.0 (X = version) or C:\Users\Public\Public Documents\Intuit\QuickBooks\Sample Company Files\QuickBooks 20XX (XX = year)

Next, repeat the following steps for each relevant QuickBooks folder on your system. Keep in mind that the available folders may vary depending on the version of QuickBooks Desktop you’re using, so you may not see every folder listed below.

  • Right-click the folder and select Properties.
  • Navigate to the Security tab and check whether Everyone appears under the Group or User Names section.
  • If Everyone is not listed, click Edit or Add, type Everyone in the field, and then click OK.
  • Select Everyone from the list and check the Allow box next to Full Control.
  • Click Apply, followed by OK, to save the permission changes.

c. Set Windows access permissions to share company files

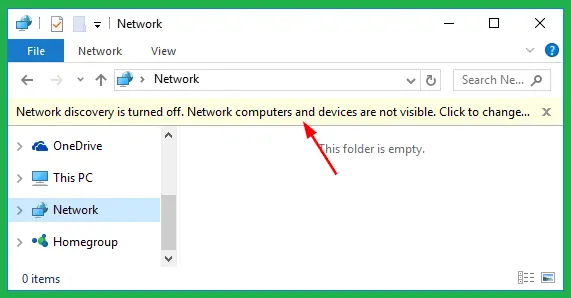
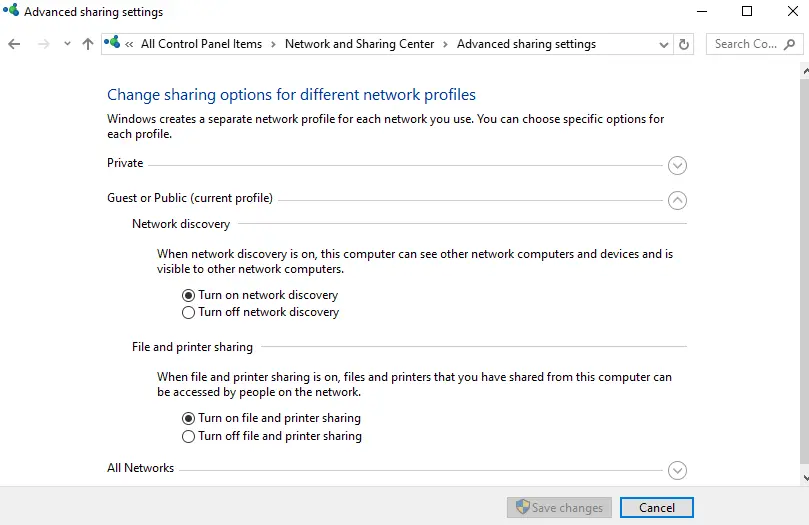
You must verify that Windows has enough access permissions so that you can avoid issues you may get while working with your company file over the network. Perform the following steps on the Windows 10 operating system.

  • First, open the Start menu and File Explorer on your workstation.
  • Find and then right-click on the QuickBooks company file folder.
  • Click Properties > Sharing > Share Add.
  • Browse to the corresponding QBDataServiceUserXX for your version.
  • Now, configure the permission level for both users to Full Control and save the changes.

Solution 4: Ping a Server From a Workstation

Issues with the network connection may also trigger hosting mode errors in QuickBooks Desktop. So, to fix the issue, ping the server from a workstation to test the internet connection. Ping your server from each workstation that is encountering the issue.

  • Open the Start menu on your server and workstations to turn on Network Discovery.
Turn-on-Network-Discovery
  • Type Network in the search box and open the Network & Sharing Center.
  • Open Change advanced sharing settings from the network options.
Change advanced sharing settings
  • Ensure that Network Discovery is turned on.
  • Also, confirm that File and Printer Sharing is enabled.

Find Your Server Name

To identify your server name, follow these steps on the server computer:

  • Open the Start menu and search for Run, then open it.
  • In the Run dialog box, type CMD and press Enter.
  • In Command Prompt window, type command ipconfig /all and press Enter.
  • Locate the Host Name under the Windows IP Configuration section. The value shown on the right is your server name.
  • Note down the Host Name or save it in a Word document for quick access later.
  • Return to the workstation to test the server connection. If needed, consider consulting an IT professional, as these steps may be technical.

Test Server Connectivity from the Workstation

  • Open the Start menu on the workstation and search for Run, then open it.
  • Enter CMD in Run dialog box and press Enter.
  • In the Command Prompt window, type ping [your server name] (without brackets) and press Enter.
  • Repeat this process on each workstation experiencing Error H202.

Check the Results

  • If you receive replies for all packets with no loss, the server connection is working correctly. You can proceed to the next solution.
  • If you see packet loss or very slow responses, stop the troubleshooting process and contact an IT professional to inspect your network.

Solution 5: Configure Your Firewall Settings on your server

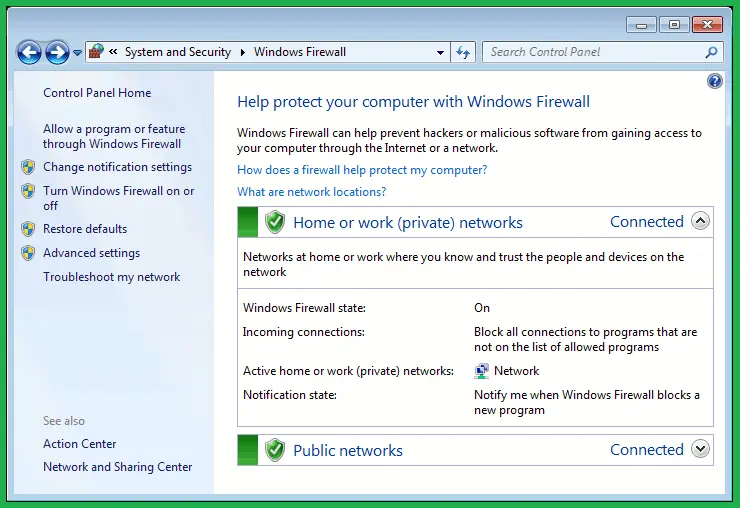
The next solution is to check the firewall settings and look if QuickBooks is added as an exception to the port to prevent the QuickBooks file not opening in multi-user mode error. Apply the following stepwise instructions to correct the firewall settings.

  • Open the Start menu, type Firewall in the search bar, and open Firewall from the search results.
  • From the Firewall window, choose Advanced Settings.
  • Following this, right-click on Inbound Rules and select the New Rule option.
  • Go to the Port option and then Next.
  • Mark the TCP checkbox while configuring, and write down the specific ports required for the QuickBooks version.
QuickBooks Desktop 2020 and later8019, XXXXX
QuickBooks Desktop 20198019, XXXXX
QuickBooks Desktop 20188019, 56728, 55378- 55382
QuickBooks Desktop 20178019, 56727, 55373-55377
  • Now, get the port number by opening the QuickBooks Database Server Manager and then clicking the Port Monitor tab. Look for the port number and write it down.
  • Mention the port number, and hit Next.
  • Choose Allow the Connection and move further.
  • Check that all profiles are marked and create a new rule. Then, rename it as QBPorts(year).
  • Click Finish after completing the process, and perform the same steps for Outbound Rules.

Create Firewall exceptions for QuickBooks programs

  • Again, open the Firewall and then click Advanced Settings.
  • Find and right-click on Inbound Rules and click New Rule.
  • Choose Program > Next > This Program Path > Browse.
  • Pick any one of these executable files from the table and hit Next.
  • Navigate to Allow the Connection and then Next.
  • Make sure you have selected all the profiles and then hit Next.
  • At last, create a new rule and assign a new name as QBFirewallException(name.exe).
AutoBackupExe.exeC:\Program Files\Intuit\QUICKBOOKS YEAR
Dbmlsync.exeC:\Program Files\Intuit\QUICKBOOKS YEAR
DBManagerExe.exeC:\Program Files\Intuit\QUICKBOOKS YEAR
FileManagement.exeC:\Program Files\Intuit\QUICKBOOKS YEAR
FileMovementExe.exeC:\Program Files\Intuit\QUICKBOOKS YEAR
QuickBooksMessaging.exeC:\Program Files\Intuit\QUICKBOOKS YEAR
QBW32.exeC:\Program Files\Intuit\QUICKBOOKS YEAR
QBDBMgrN.exeC:\Program Files\Intuit\QUICKBOOKS YEAR
QBServerUtilityMgr.exeC:\Program Files\Common Files\Intuit\QuickBooks
QBCFMonitorService.exeC:\Program Files\Common Files\Intuit\QuickBooks
QBLaunch.exeC:\Program Files\Common Files\Intuit\QuickBooks
QBUpdate.exeC:\Program Files\Common Files\Intuit\QuickBooks\QBUpdate
IntuitSyncManager.exeC:\Program Files\Common Files\Intuit\Sync
OnlineBackup.exeC:\Program Files\QuickBooks Online Backup

Solution 6: Disable QuickBooks Multi-User Hosting on Client Computers/Workstations

Verify that the QuickBooks multi-user hosting is enabled on the server computer, not the client workstations. Follow these steps to disable multi-user hosting on other workstations.

  • Open the QuickBooks program on your client workstations and click the File menu.
  • Go to Utilities, and if the host multi-user access option is visible, avoid this option.
  • Choose the Stop Hosting Multi-User access option if it’s visible on a client computer. Click on this option to disable it.
  • At last, repeat the same steps to turn off multi-user in your workstations.

Conclusion

The ” QuickBooks hosting mode is off error occurs when the server computer hosting the company file is not set properly, preventing the opening of the file in multi-user mode. But you can fix this issue by checking the internet connection, disabling the multi-user hosting settings, correcting firewall settings, and running QBDBMgrN properly. If the error still continues, then we suggest that you directly contact our QB Data service team experts for help +1(888)-718-7888.

Frequently Asked Questions (FAQ’s)

QuickBooks hosting mode is off when the server cannot host the QuickBooks company file across the network. As a result, workstations fail to connect with the company file in a multi-user environment and may trigger network or access errors. 

To fix this error, enable hosting on the server, disable hosting on all workstations, restart QBDBMgrN, run QuickBooks File Doctor, and restart QuickBooks services. 

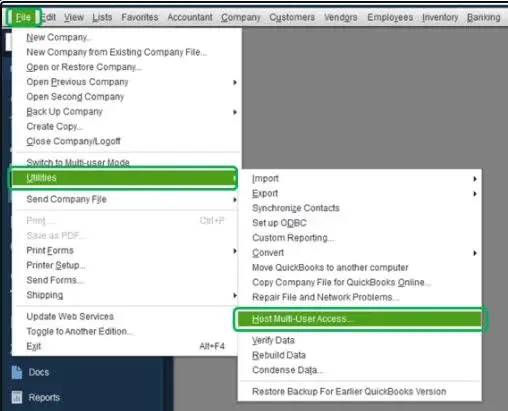
Host multi-user access is greyed out in QuickBooks if hosting is already enabled or when you’re trying to open QuickBooks on a workstation rather than the server. 

To enable hosting on a QuickBooks server;

  • Launch QuickBooks on your server computer and click File > Utilities
  • Choose the Host Multi-User Access option if available. 
  • Now, confirm the prompt.
  • Finally, restart QuickBooks and check if the workstations can access the shared company file.

Yes, the QuickBooks Database Server Manager can scan company files and can manage network descriptors even though the hosting mode is disabled. But to access the company file in multi-user mode, hosting must be enabled on the server. 

To configure the hosting settings correctly, enable hosting on the server, disable hosting on all workstations, share the company file folder with proper permissions, and verify QBDBMgrN is running properly. 

QuickBooks can’t connect to the host computer if hosting is disabled on the server, the firewall blocks QuickBooks, Database Server Manager isn’t running, network permissions are incorrect, or ND files are corrupted. 

To restore multi-user access, turn on hosting mode on the server, disable hosting on all workstations, rescan the company file folder, and repair damaged network files.  

About The Author

Steven Moody

Steven Moody is a bookkeeping and payroll specialist dedicated to helping businesses maintain accurate financial records and efficient payroll operations. His expertise includes payroll management, tax compliance, bookkeeping solutions, and financial reporting. Steven regularly shares insights on accounting best practices and business finance strategies. Outside of work, he enjoys traveling, exploring new places, and keeping up with the latest developments in business technology.

Steven Moody

QuickBooks Error

QuickBooks Outlook is not responding? Try These Proven Methods

Read More
QuickBooks

What is QuickBooks? Features, Updates & Pricing You Need to Know

Read More
QuickBooks Desktop

QuickBooks Has Stopped Working? Here’s How to Fix It Fast

Read More
QuickBooks Tool

QuickBooks Database Server Manager: How To Install, Update and setup

Read More
QuickBooks Tool

What Is QuickBooks Refresher Tool & How to Use It

Read More