Are you facing QuickBooks check alignment problems while printing checks? Sometimes, the payee name, date, or amount appears in the wrong place on the check. You may face this issue due to incorrect printer settings, paper size, or alignment options. You can resolve many of these issues by checking your printer configuration and adjusting the alignment settings in QuickBooks Desktop or QuickBooks Online.
In this guide, we will explain the common causes of QuickBooks Check Alignment Problems and simple, step-by-step solutions. You will also learn how to test check alignment before printing on actual check stock and what to do if the problem continues.
QuickBooks check alignment problems happen when the printed information does not appear in the correct place on a check. The text may print too high, too low, or too far to the left or right. These problems can occur because of incorrect printer settings, paper issues, or QuickBooks printing preferences. Here are some common causes.
If your printer is set to Fit to Page, the check details may print in the wrong position. So, check the print settings and select 100% actual size when suitable.
Sometimes, old browser data can affect printing in QuickBooks Online. Clearing your browser’s cache and cookies and trying again may help resolve the issue.
Using the wrong type or size of check paper can cause the printed details to appear outside the correct fields. Make sure your check paper matches the format selected in QuickBooks.
Incorrect settings in Adobe Acrobat Reader or your browser PDF viewer can affect how checks print. You should check the paper size and scaling options before printing.
Incorrect printer settings, outdated drivers, or paper loaded incorrectly can cause alignment issues. Check your printer settings and make sure the paper is positioned properly.
QuickBooks has alignment settings that help move printed information into the correct position. If these settings are not adjusted properly, the check details may not line up with the printed fields. Print a sample on plain paper and adjust the alignment before using actual checks.
You can fix QuickBooks check alignment problems by checking your printer settings and adjusting the check alignment in QuickBooks. Before printing on actual check paper, use plain paper to test the alignment and avoid wasting checks. The steps may differ depending on whether you use QuickBooks Online or QuickBooks Desktop.
If your checks are printing too high, too low, or out of position in QuickBooks Online, follow these steps that match your check type. For QuickBooks Online Payroll checks:
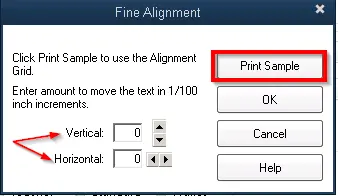
If the printed information is too high, too low, too far left, or too far right, adjust the alignment according to the instructions shown on your screen.
Note: These steps apply to QuickBooks Online Payroll’s compatible paycheck printing workflow. Regular business checks may use a different print setup.
If your regular business checks are not printing correctly in QuickBooks Online, you can use the print setup to check and adjust their alignment. Follow the steps below:
If the checks are still misaligned, review the paper size and scaling settings in your browser or PDF print window. Avoid selecting options such as “Fit to Page” if they change the size of the check layout.
Tip: Always test the alignment on plain paper first. This helps you avoid wasting preprinted checks while adjusting the settings.
QuickBooks check alignment problems in Desktop can occur when the printed information does not line up with the fields on preprinted checks. The payee name, date, check amount, or other details may appear too high, too low, or too far to the left or right. Incorrect printer settings or a mismatched check format can also contribute to these issues. Follow the steps below to troubleshoot check printing alignment in QuickBooks Desktop.
Selecting an incorrect check style can cause the printed information to appear outside the designated fields.
If your QuickBooks Desktop version and printer setup support alignment controls, select Align in the Printer Setup window.
Follow the on-screen instructions to open the alignment settings and prepare a sample print. Available options may vary depending on your QuickBooks version and printer type.
Before using actual check stock, you can print a sample on plain paper. Place the sample over a blank check and compare the printed information with the check fields. Check the position of the payee name, date, amount, and other relevant details.
Identify whether the information is too high, too low, too far left, or too far right.
Use the available alignment controls to make small adjustments to the printed position.
These directions describe the intended correction; follow the controls and instructions available in your version of QuickBooks Desktop.
After adjusting the position, print another sample and compare it with your check stock. Repeat the process until the information fits the intended fields.
If still QuickBooks check alignment problems, review the printer configuration and troubleshoot related printing issues. Check the following settings:
Print another sample after making any necessary changes.
Once the sample is correctly aligned, save or finish the setup as applicable to your QuickBooks Desktop version.
Print one check and verify the printed information before printing additional checks. If the problem continues despite these adjustments, consult QuickBooks Support or your printer manufacturer’s support team.
Important: QuickBooks Desktop alignment options can differ by version and printer type. For official instructions, refer to Intuit’s guide to fixing print alignment for continuous-feed printers in QuickBooks Desktop.
Incorrect printer settings can cause QuickBooks check alignment problems, even when the alignment has been adjusted in QuickBooks. Settings such as paper size, print scaling, page orientation, and printer drivers can affect where the check information appears on the page. Follow these troubleshooting tips to identify and correct common printer configuration issues.
If QuickBooks check alignment problems continue after adjusting the settings, try these troubleshooting steps:
QuickBooks Check Alignment Problems can make printing checks frustrating and lead to wasted check stock. However, you can also fix this problem by adjusting alignment settings, checking printer configurations, and selecting the correct check format in QuickBooks Online or Desktop. Always print a sample on plain paper before using actual checks to ensure that the information fits the correct fields. If the problem continues, review your printer settings or contact Data Service Team specialists at +1(888)-718-7888 for better assistance.
Checks may print out of alignment because of incorrect printer settings, paper size, scaling options, or check format. Verify these settings and print a sample to identify the problem.
Open File, select Printer Setup in QuickBooks Desktop, and select the appropriate check form. If alignment controls are available, adjust the printed position and test the result on plain paper.
For regular checks, select + New, then Print checks, and open Print setup. Follow the on-screen instructions. For compatible payroll checks, open Payroll Settings and use the Align check option.
Open the alignment settings and adjust the vertical position of the printed text. Make small changes and print another sample until everything lines up correctly.
Print a sample on plain paper instead of using an actual check. Place it over a blank check to see whether the details match the correct fields.
Check the paper size, orientation, and scaling settings. If you recently changed your printer driver, check for an updated compatible version and test the alignment again.
Yes, supported QuickBooks printing workflows provide alignment settings that let you adjust the position of printed information without editing the original check template.
Check your printer settings and make sure you selected the correct check format. Print another document to see whether the problem is related to your printer or QuickBooks. If it continues, contact support for help.
You can contact the Data Service Team for expert assistance if your checks continue to print incorrectly. The team can help you troubleshoot QuickBooks check alignment problems and guide you toward the right solution.

Get Free Consultation for QuickBooks Upgrade
(2021, 2022, 2023)