Still using QuickBooks Desktop 2021, 2022, or 2023? You may be wondering how to upgrade without losing important company data or disrupting your daily accounting work. A Upgrade QuickBooks Desktop process can come with challenges, from installation errors and company-file conversion issues to problems with payroll and bank feeds. The good news is that proper preparation can help you avoid many common mistakes.
In this guide, we’ll walk you through the upgrade process, explain how to protect your financial records, and share practical solutions for common problems so you can move to a supported version easily.
A QuickBooks upgrade means moving from an older version of QuickBooks Desktop to a newer version that supports your business needs. You also need to make sure your company file, accounting features, and connected services work properly after the Upgrade. Here are the key things to understand before getting started:
Software upgrade: Installing a newer version of QuickBooks Desktop.
Company-file conversion: Updating your existing company file to work with the newer version.
Data protection: Creating a verified backup before making changes to your accounting records.
Compatibility checks: Confirming that your operating system, hardware, and QuickBooks edition meet the requirements.
Connected services: Checking whether payroll, bank feeds, payment processing, and third-party integrations are supported.
Post-upgrade testing: Reviewing transactions, financial reports, and account balances to identify unexpected changes.
An upgrade moves you to a newer software version, a clean installation replaces the software installation, and migration transfers data to another computer or accounting platform.
Why Are Users Moving From QuickBooks 2021, 2022 & 2023?
Many businesses still use QuickBooks Desktop 2021, 2022, or 2023 to manage invoices, expenses, payroll, and financial reports. However, these versions have reached their official service-discontinuation dates, making it important for users to consider upgrading. According to Intuit, the service-discontinuation dates are:
QuickBooks Desktop 2021: May 31, 2024
QuickBooks Desktop 2022: May 31, 2025
QuickBooks Desktop 2023: May 31, 2026
After service discontinuation, affected products lose access to certain connected services and live technical support. Applicable critical security updates are also no longer provided.
Common Reasons to Consider a Upgrade QuickBooks Desktop
Businesses may consider a Upgrade QuickBooks Desktop for multiple reasons:
Access to supported services: Older versions may no longer support certain online banking, payroll, and payment services.
Security considerations: Discontinued versions no longer receive applicable critical security updates from Intuit.
Technical support: Live technical support may no longer be available for discontinued products.
Software compatibility: Newer operating systems and third-party applications may require a supported QuickBooks version.
Business needs: A newer version may better meet changing accounting and integration requirements.
Before upgrading, check which newer QuickBooks Desktop version is available for your business.
Note: Older versions may still open company files, but discontinued services and support can affect daily accounting tasks.
What to Check Before Upgrading?
Before starting a Upgrade QuickBooks Desktop, check your current software, company file, and connected services. A little preparation can help prevent installation problems and protect your accounting records. Here are the main things to check before upgrading:
Confirm your current version and edition so you can choose a compatible upgrade.
Create a backup before making changes. Follow Intuit’s backup instructions.
Confirm that your existing File can be converted to the intended version. Read Intuit’s compatibility guide.
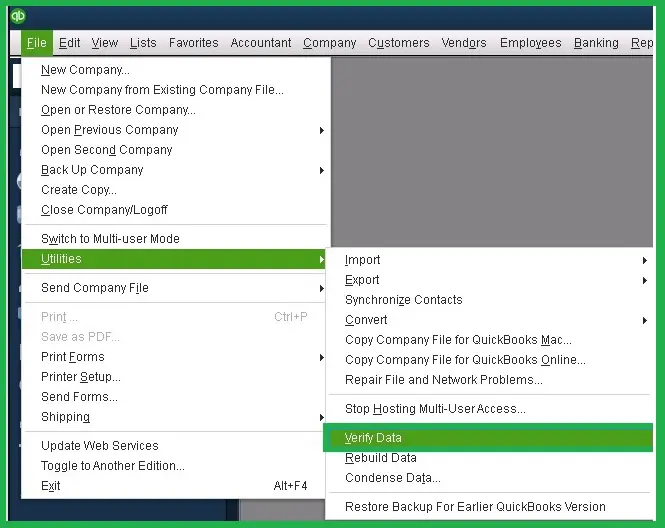
Run Verify Data and address any reported problems before upgrading.
Confirm that you can access and activate the destination product.
Check whether the services you rely on are supported by your intended version.
If your company file is shared, review the server and workstation requirements before changing versions.
Confirm compatibility with the software your business uses alongside QuickBooks.
QuickBooks Pre-Upgrade Checklist
Before starting a Upgrade QuickBooks Desktop, complete these essential checks to protect your company data and avoid common upgrade problems.
Back Up Your Data: Create a company file backup and save a copy to an external drive or secure location.
Verify Company-File Health: Run the Verify Data utility and resolve any reported issues.
Save Financial Reports: Export your Balance Sheet, Profit and Loss, and Accounts Receivable/Payable reports for comparison after upgrading.
Check System Requirements: Confirm that your computer meets the destination version official requirements.
Confirm Compatibility: Check your QuickBooks edition, company-file compatibility, and country version.
Prepare Credentials: Keep your Intuit account details, license information, and administrator access ready.
Check Connected Services: Review payroll, bank feeds, payment processing, and third-party integrations.
Prepare Multi-User Access: Plan the Upgrade for your server and workstations if multiple users share the company file.
Important: Always create and verify a backup before beginning the Upgrade.
How to Back Up the QuickBooks Company File?
A company file backup protects your accounting records if an installation fails or a conversion problem occurs during a Upgrade QuickBooks Desktop. QuickBooks Desktop for Windows allows you to create a local backup using the built-in backup utility.
Steps to Create a Backup
Open QuickBooks and sign in to your company file as an administrator.
Switch to Single-user Mode if you’re currently using Multi-user Mode.
Open the File menu, select Back up Company, and choose Create Local Backup.
Select Local Backup, then click Next.
Choose a secure folder for storing the backup.
Follow the on-screen instructions to complete the backup and verification process.
Confirm that the backup file, usually ending in .QBB, has been created successfully.
Important Backup Tips
Keep an additional copy on an external drive or another secure location.
Retain the original company file until the Upgrade is complete.
Verify that the backup can be restored if needed.
Save payroll forms separately when necessary, as they may not be included in a standard company file backup.
How to Check Company-File Health Before Upgrading?
Users must check their company file before a Upgrade QuickBooks Desktop, it helps you identify potential data problems before conversion.
1. Run the Verify Data Utility
Close all open windows in QuickBooks.
Open the File menu, select Utilities, and choose Verify Data.
Wait for the verification process to finish.
If QuickBooks reports no problems with your data, proceed with your other pre-upgrade checks.
If QuickBooks reports that your data has lost integrity or displays an error, follow Intuit’s recommended troubleshooting steps.
2. Rebuild Damaged Data if Necessary
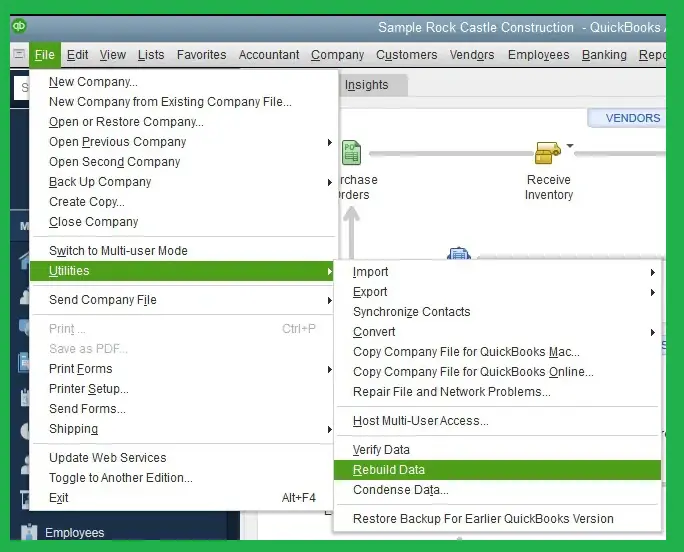
Open the File menu, select Utilities, and choose Rebuild Data.
Follow the prompts to create a backup before proceeding.
Allow the rebuild process to finish.
Run Verify Data again to check whether the reported issue has been resolved.
Important: If you use Assisted Payroll, contact Intuit support before running Rebuild Data. Some data problems may require additional troubleshooting.
3. Record Important Financial Information
Save key reports, including the Balance Sheet and Profit and LossStatement.
Review bank and credit card reconciliation status.
Record important account balances and connected applications.
Create a separate, verified backup and store it in a secure location.
These checks help you compare your accounting records after the Upgrade and identify unexpected discrepancies.
QuickBooks Upgrade Compatibility Checklist
QuickBooks Desktop upgrades need compatible software, a supported system environment, and a reliable company file backup. You can review the following compatibility checklist before upgrading your accounting data.
Version & File Compatibility
QuickBooks Pro vs Premier vs Enterprise: Pro and Premier files are mutually compatible. Pro and Premier files can upgrade to Enterprise Solutions, but Enterprise files cannot open in Pro or Premier.
Backward Compatibility: QuickBooks does not support backward compatibility. Once a company file is upgraded to a newer version, older versions cannot open or edit it.
Version Gap Limits: Direct upgrades typically require the version gap to be small; larger gaps may require purchasing an intermediate version or license.
Region-Locking: Company files are region-locked and must match the geographic version of QuickBooks.
System Requirements
Operating System (Windows): Windows 10 or Windows 11 (64-bit), or Windows Server 2016 through 2022 natively installed (Windows 8.1 and Server 2012 are unsupported).
Operating System (Mac): macOS v12.0 (Monterey) or later with an Intel or Apple CPU.
Hardware & RAM: Minimum 2.4 GHz processor (Intel/AMD) and 8 GB RAM minimum (16 GB recommended for multi-user or server environments).
Disk Space & Software: At least 2.5 GB of available disk space plus .NET Framework 4.8.
How to Upgrade QuickBooks Desktop Step by Step?
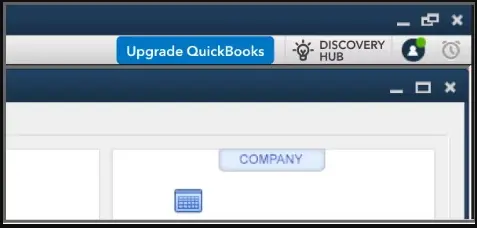
The Upgrade QuickBooks Desktop process depends on your operating system, product edition, and subscription. QuickBooks Desktop users may be able to upgrade through an automatic prompt or the software’s built-in upgrade options.
1. Upgrade QuickBooks Desktop for Windows
Before upgrading, create a backup of your company file and confirm that your subscription or license supports the new version.
Method 1: Use the Automatic Upgrade Prompt
Open QuickBooks Desktop.
If an upgrade prompt appears, select Upgrade Now.
Choose whether to keep the old version installed.
Select Let’s go to begin the process.
Wait for the download, installation, and activation to finish.
Select Open QuickBooks when prompted.
Method 2: Use Discovery Hub
Open QuickBooks Desktop and select Discovery Hub.
Choose the available QuickBooks upgrade option.
Select Proceed to upgrade, then choose Upgrade Now.
Decide whether to keep the previous version installed.
Select Let’s go and wait for the installation to finish.
Method 3: Use QuickBooks Desktop Manager
Before using QuickBooks Desktop Manager, Download QuickBooks Desktop from the appropriate source and keep your license information available.
Open QuickBooks Desktop Manager.
Enter your license information if requested.
Follow the on-screen instructions to complete the installation.
If the Upgrade Prompt Does Not Appear
Open the Edit menu and select Preferences. Under General, look for the option to restore one-time messages. Enable it if available, save the change, and reopen QuickBooks to check for the prompt.
2. Upgrade QuickBooks Desktop for Mac
Mac users should switch to Single-user mode before upgrading the software.
Method 1: Use the Automatic Prompt
Open QuickBooks Desktop for Mac.
Select Upgrade for Free if the prompt appears.
Select Let’s go to download and install the new version.
Wait for the Upgrade to finish.
Open QuickBooks and activate or register the new version if prompted.
Method 2: Use the Help Menu
Open QuickBooks Desktop for Mac.
Select the Help menu.
Choose Upgrade QuickBooksDesktop.
Select Upgrade for Free, then select Let’s go.
Open QuickBooks when the installation finishes and complete activation if required.
What to Do After Upgrading?
Open your company file and complete the conversion if QuickBooks requests it.
Check account balances, transactions, and financial reports.
Test payroll, bank feeds, printing, and integrations that your business uses.
Confirm multi-user access if your company file is shared.
Create a fresh backup after verifying the upgraded File.
Note: Your upgrade option may vary by product, subscription, and release. Follow the instructions displayed in your version of QuickBooks and verify that the destination version is available for your license.
Company File Won’t Open After Upgrade: How to Fix It
If your company file won’t open after a QuickBooks upgrade, the problem may be related to saved windows, file permissions, network issues, or a damaged installation. You can try the solutions below:
Open Without Saved Windows: Open QuickBooks, select your company file, and hold the Alt key while clicking Open. Follow the sign-in prompts if necessary.
Use QuickBooks Tool Hub: Open Tool Hub, select Company File Issues, and run Quick Fix My File. If the problem continues, try QuickBooks File Doctor.
Try a Local Copy: First, copy your .QBW file to your desktop and try opening it. If it works, check the original folder’s permissions and network settings.
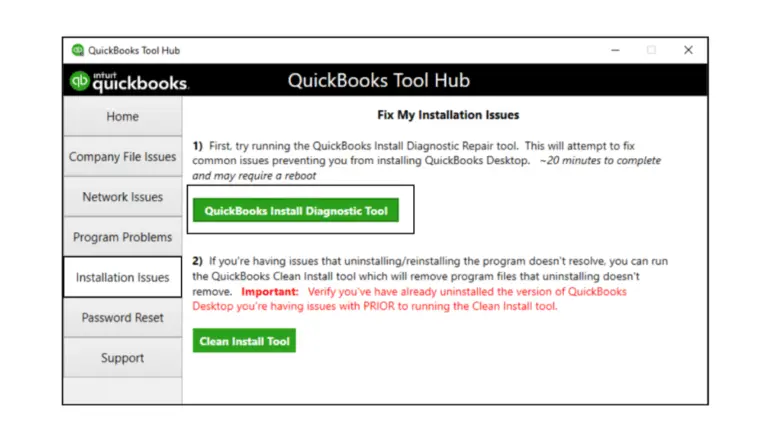
Repair QuickBooks: Use the Tool Hub Program Problems or Installation Issues tools to troubleshoot the installation.
Important: Back up your company file before attempting repairs. If the problem persists, follow Intuit’s official troubleshooting guide.
How to Fix QuickBooks Upgrade or Installation Failed Problems?
If QuickBooks Desktop fails to install or upgrade, the problem may be related to damaged installation components, Windows settings, or temporary files. Try these troubleshooting steps before attempting the installation again.
Restart your computer and try the installation again.
Step 2: Run QuickBooks as Administrator
Right-click the QuickBooks Desktop icon and select Run as administrator. If Windows requests permission, approve it if appropriate, then retry the operation.
Step 3: Clear Temporary Files
Press Windows + R.
Type %temp% and press Enter.
Select temporary files and delete those Windows allows you to remove safely.
Restart your computer and try the installation again.
Step 4: Check Windows Components
Your QuickBooks installation may depend on Windows components such as Microsoft .NET Framework. Check the system requirements and follow Microsoft’s instructions to repair any relevant components. Avoid disabling security software or changing Windows settings unnecessarily.
Important: The correct solution depends on the error code and QuickBooks version. If installation still fails, note the exact error message and follow Intuit’s official troubleshooting guidance.
How to Recover QuickBooks Data Missing After Upgrade?
To recover QuickBooks Data Missing after an upgrade, use the built-in QuickBooks Auto Data Recovery tool, run data integrity utilities, or restore from a recent backup.
Method 1: Use QuickBooks Auto Data Recovery (ADR)
If you are using QuickBooks Desktop, ADR uses your transaction log files and copy files to restore recent records.
Create a blank folder on your desktop and name it QBTest.
Open the folder where your original company file is saved (default path: C:\Users\Public\Public Documents\Intuit\QuickBooks\Company Files).
Show file extensions in Windows Explorer.
Copy the .tlg.adr and .qbw.adr files and paste them into the QBTest folder.
Remove .adr from the end of the file names inside the QBTest folder so they become standard .qbw and .tlg files.
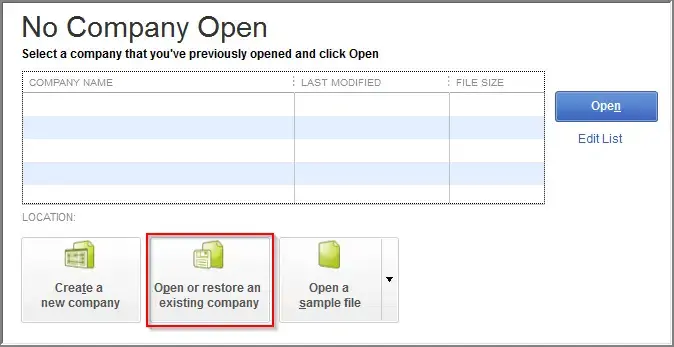
Open QuickBooks, go to File> Open or Restore Company, and open the company file stored inside your QBTest folder to check if your missing data has returned.
Verify the data integrity.
Method 2: Restore From a Backup Copy
If you created a backup prior to running the Upgrade:
Open your QuickBooks and navigate to File and click Open or RestoreCompany.
Select Restore a backup copy, then click Next.
Choose your backup file and follow the on-screen prompts to select a save location.
For QuickBooks Online, go to Settings, select Backup Company, then select the relevant backup point by date and time, and click Restore.
Method 3: Run Verify and Rebuild Data Utilities
If the data is present but corrupted or hidden due to post-upgrade glitches.
In QuickBooks Desktop, go to File> Utilities, then select Verify Data to check for file damage.
If issues are found, go to File> Utilities and then click Rebuild Data.
Allow QuickBooks to automatically fix the detected damage and create an automatic backup.
QuickBooks Online: Check the Audit Log to see if entries were accidentally deleted or modified during the transition.
Missing Bank Transactions: Re-download the missing entries from your bank/credit card provider as a .QBO or web-connect file and re-import them via Bank Transactions > Upload from File.
How to Fix QuickBooks Payroll Problems After Upgrade?
If payroll stops working after a QuickBooks upgrade, the issue may be related to your subscription, outdated tax tables, or installation problems. Here are a few things you can try:
Check Your Payroll Subscription: Open QuickBooks and go to Employees > My Payroll Service > Manage Service Key. Check whether your subscription is active and your service key is correct.
Run QuickBooks as Administrator: Close QuickBooks, right-click its icon, and select Run as administrator. Then check whether payroll works.
Use QuickBooks Tool Hub: If the problem continues, open QuickBooks Tool Hub, select Program Problems, and run Quick Fix My Program.
Note: If payroll still doesn’t work, check whether your QuickBooks version supports payroll services. You can also refer to Intuit’s official support guide.
Fix QuickBooks Bank Feeds Not Working After Upgrade
Bank feeds are useful because they save time when recording transactions. But if they stop working after a QuickBooks upgrade, checking a few things can help you identify the cause. Before trying anything else, check these points:
Are your bank login details accurate?
Is your financial institution experiencing a service issue?
Does your QuickBooks version still support the required banking services?
Are you importing transactions that have already been downloaded?
You should avoid importing the same transactions repeatedly, as this can create duplicates. For discontinued versions, check Intuit’s official service-discontinuation policy.
Fixing QuickBooks Multi-User Mode Not Working After Upgrade
When QuickBooks works on the main computer but not on other workstations, the problem may involve network access or the database server.
Before changing any settings, you should check whether the computer hosting the company file is switched on and accessible. Here are some common things to find:
Hosting configuration and database-server settings
The company file can not be located
File path and folder access
Multi-user access stops unexpectedly
Firewall configuration and database services
If the error continues, note the exact error code before attempting further changes. You can then follow Intuit’s multi-user error guidance.
QuickBooks Printing and PDF Errors: What to Do
Suppose you are only finishing the invoice to find that QuickBooks won’t print it or save it as a PDF. This can interrupt everyday accounting work, but the cause is not always the QuickBooks installation itself.
First, try printing a document from another application. If that also fails, check your printer connection and driver. If printing works elsewhere, try these checks inside QuickBooks:
Make sure the correct printer is selected.
Try printing a different report or form.
Check whether the problem affects every document or just one custom template.
Keep a copy of important customized forms before making changes.
If you’re still having trouble, follow Intuit’s PDF and printing troubleshooting instructions.
QuickBooks Won’t Open or Has Stopped Working? Try These Solutions
If QuickBooks freezes at startup or closes unexpectedly after an upgrade, first determine whether the problem affects the software or just one company file.
Try this simple test: Open QuickBooks without opening your company file, then try a sample company file if available.
If the sample file opens: The issue may involve your company file, its location, or its permissions.
The sample file also fails: The QuickBooks installation or application may need troubleshooting.
For application problems, open QuickBooks Tool Hub and select Program Problems, then click Quick Fix My Program. If the issue continues, use the appropriate installation troubleshooting tool.
After upgrading QuickBooks Desktop, some connected applications may need updates or configuration changes. Check the following points to avoid common problems:
Check compatibility: Confirm that the application supports your new QuickBooks version.
Update Connected Apps: Install any required updates for inventory, CRM, payment, or reporting software.
Test Data Syncing: Make sure customer records, invoices, payments, and other important data transfer correctly.
Check for Errors: Look for connection issues or error messages after the Upgrade.
Tip: Check compatibility before upgrading to reduce the risk of business interruptions.
QuickBooks API and Integration Issues After an Upgrade
If your business uses custom software for QuickBooks Enterprise API Integration, an upgrade may affect how the applications exchange data. Check these points before and after upgrading:
SDK Compatibility: Confirm that your integration supports the QuickBooks version you’re installing.
Web Connector: Check whether your connected application requires an updated QuickBooks Web Connector setup.
Data Transfer: Test whether invoices, customer records, and payments are syncing correctly.
Error Messages: If the connection fails, check the error logs and contact the integration provider.
What If the User Doesn’t Want to Upgrade?
Some businesses prefer to keep using their current QuickBooks version because their existing accounting processes work well. However, using an older version may limit access to certain services and technical support. If you’re not ready to upgrade, keep these points in mind:
Check Service Availability: Confirm whether payroll, bank feeds, and payment services are still supported.
Back Up Your Data: Keep regular backups of your company file in a secure location.
Review Security Risks: Discontinued versions may no longer receive applicable security updates from Intuit.
Check Compatibility: Make sure your essential business applications continue to work.
Plan Ahead: Consider moving to a supported version if your current software no longer meets your needs.
Important: A backup can help you protect your accounting records, but it can’t restore discontinued services or replace missing security updates.
Upgrade vs. Clean Install vs. Migration: What’s the Difference?
These three processes serve different purposes. Choosing the right one depends on whether you want to use a newer version, fix an installation problem, or move QuickBooks to another computer.
Process
What It Means
When to Use It
Upgrade
Install a newer QuickBooks version and update your company file when required.
When moving to a newer release.
Clean Install
Remove and reinstall QuickBooks to troubleshoot certain software problems.
When the installation needs repair.
Migration
Transfer your company file and relevant data to another computer or accounting system.
When changing computers or platforms.
Which Option Is Right for You?
Choose an upgrade if you want to move to a newer QuickBooks version. Always back up your company file before converting it.
Consider a QuickBooks Clean Install Tool if QuickBooks has installation problems that other troubleshooting steps haven’t resolved. Intuit explains how to reinstall the software without affecting your company data.
Choose migration if you’re moving to a new computer. You’ll need to transfer your company file and check whether other files or settings need to be moved separately.
Before starting, create a backup and confirm that you can restore it if necessary.
Upgrade QuickBooks Desktop and update your company file.
If your QuickBooks company file shows errors or stops working after an upgrade, check it for data damage before trying other fixes. QuickBooks Desktop includes tools to identify and repair certain company-file problems. You can use Verify and Rebuild Data in QuickBooks Desktop to check and repair certain data issues.
Run Verify Data: Open QuickBooks, select Window, then Close All, and go to File, Utilities, then Verify Data.
Check the Results: If QuickBooks reports a data-integrity problem, follow Intuit’s recommended troubleshooting steps.
Create a Backup: Save a new backup before attempting to rebuild your company file.
Run Rebuild Data: Open File, Utilities, then Rebuild Data and follow the on-screen instructions.
Verify the File Again: Once the rebuild finishes, run Verify Data again to check whether the problem has been resolved.
Moving QuickBooks Desktop to a New Computer
Moving your QuickBooks Desktop to a new computer requires more than installing the software. You also need to transfer your company file and make sure your accounting records are accessible. Follow these steps to make the move easier:
Back Up Your Company File: On your old computer, create a backup using the QuickBooks backup utility and save it to a secure location.
Install QuickBooks: Install the appropriate QuickBooks version on your new computer and make sure you have the required license information.
Transfer Your Backup: Copy the backup file to the new computer using a secure storage device or another suitable transfer method.
Check Your Data: Review account balances, transactions, and financial reports to make sure your records are correct.
Test Connected Services: Check payroll, bank feeds, printing, and third-party applications where applicable.
Complete Before-and-After Upgrade Checklist
Before upgrading QuickBooks Desktop, take a few minutes to prepare your company file and check your system.
Before the Upgrade
Confirm your current QuickBooks version and edition.
Check the new version’s official system requirements.
Confirm that your license or subscription allows the Upgrade.
Create a company file backup and keep it in a secure location.
Run Verify Data and address any reported problems.
Save important financial reports for comparison.
Check payroll, bank feeds, and payment-service availability.
Confirm compatibility with third-party applications.
Plan the Upgrade for the server and workstations if you use Multi-user Mode.
After the Upgrade
Open your company file and complete the conversion if prompted.
Review account balances, transactions, and financial reports.
Check outstanding invoices, bills, and bank reconciliations.
Test payroll and bank feeds if those services are supported.
Check printing and PDF creation.
Test connected applications and integrations.
Confirm that Multi-user Mode works on all relevant computers.
Create a fresh backup after checking the upgraded company file.
When to Contact a QuickBooks Expert?
If QuickBooks upgrade problems continue after troubleshooting, professional help may be needed. You can contact a QuickBooks expert if your company file won’t open, data is missing, payroll is not working, or installation keeps failing.
You can also reach out to the Data Service Team to speak with a live expert about QuickBooks upgrade issues and company-file problems.
Conclusion!
A Upgrade QuickBooks Desktop process requires proper planning to protect your company data and avoid common errors. Before upgrading, create a verified backup, check system compatibility, and resolve any company-file issues. After upgrading, review financial reports, verify account balances, and test payroll, bank feeds, and connected applications. If you encounter problems, you can contact the Data Service Team at +1(888)-718-7888 professionals for better guidance.
Frequently Asked Questions (FAQ’s)
Yes, upgrading is recommended because QuickBooks Desktop 2021 is discontinued and no longer receives support and updates.
Yes, you can upgrade to a latest compatible version. First, take a backup of your company file and check the system requirements for smoother performance.
Yes, newer compatible versions can usually open and convert older company files. Once converted, the File may not open in the older version.
Upgrading should not delete your data, but unexpected problems can occur. Always create a backup before starting.
Yes, create a company file backup and save it in a secure location before upgrading.
Check the file location and permissions, then use QuickBooks Tool Hub to troubleshoot the problem. Keep a backup before attempting repairs.
Bank feeds may stop working because of connection issues, incorrect login details, or unsupported QuickBooks versions. Check your bank connection and service compatibility.
Payroll should work if your QuickBooks version and payroll subscription support the service. Check your subscription and install the latest available payroll updates.
Most reports and custom forms should remain available, but you should review them after upgrading to confirm everything works correctly.
Yes, but you must ensure that all computers using the company file meet the requirements for the upgraded version.
Restart your computer, check system requirements, and use QuickBooks Tool Hub to troubleshoot installation problems. Note any error codes before trying again.
Yes, in a multi-user setup, the server and workstations should use compatible QuickBooks versions to ensure everyone can access the company file properly.
About The Author
Steven Moody is a bookkeeping and payroll specialist dedicated to helping businesses maintain accurate financial records and efficient payroll operations. His expertise includes payroll management, tax compliance, bookkeeping solutions, and financial reporting. Steven regularly shares insights on accounting best practices and business finance strategies. Outside of work, he enjoys traveling, exploring new places, and keeping up with the latest developments in business technology.