QuickBooks-Multi-User-Mode-Not-Working

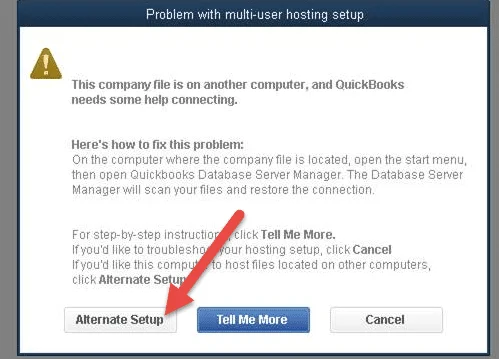
Running multi-user mode in QuickBooks allows more than one user to access the same company file simultaneously from different locations. As a result, it makes team collaboration easier and makes it easier to work together. But sometimes users may come across a QuickBooks multi-user mode not working error, which prevents users from accessing the company file in a multi-user environment. When this error appears, it shows the following alert message:

This company file is on another computer and QuickBooks needs some help connecting.

Unfortunately, this error may prevent users from switching from single-user mode to multi-user mode despite various attempts. Fixing this error is essential to restore access to multi-user mode. In this comprehensive guide, we have covered what the QuickBooks multi-user mode not working error is, causes, and easy troubleshooting methods to fix it.

What is QuickBooks Multi-User Mode Not Working Error?

QuickBooks multi-user mode not working error occurs when your workstations fails to communicate with the company file stored on the host server. So, instead of opening the company file in multi-user mode, QuickBooks may start flashing errors like,

  • QuickBooks Error H202
  • QuickBooks Error H101
  • QuickBooks Error H505
  • QuickBooks cannot communicate with the server
  • Company file is located on another computer
  • Unable to switch to multi-user mode

Why Is QuickBooks Not Working In Multi-User Mode?

The major reason QuickBooks does not work in multi-user mode is incorrect hosting settings. However, it may also be caused by multiple other reasons. These may include;
QuickBooks Multi-User Mode Not Working
  • A firewall or antivirus software may block communication between user computers.
  • Another prominent reason is that the file permissions in Windows are configured incorrectly.
  • The QuickBooks Database Server Manager is unable to open the company file.
  • A corrupted Network data file can stop QuickBooks from locating the shared company file.
  • Incorrect DNS settings may also lead to QuickBooks multi-user mode not working and the H202 error.
  • QuickBooks services such as QuickBooksDBXX and QBCFMonitorService aren’t working properly.
  • It may also be caused by improper Windows sharing permissions preventing users from accessing the company file.

Fix Multi-User Mode Not Working in QuickBooks Error With These Simple Solutions

If your multi-user mode is still not working in QuickBooks, then perform the below-given troubleshooting methods and regain access to multi-user mode.

Solution 1: Run the QuickBooks Database Server Manager on your server

The server computer is the one that holds your QuickBooks company files. Other computers connected to your network are the workstations.

  • Confirm that you have downloaded and installed the latest version of QuickBooks Tool Hub.
  • Open the QuickBooks Tool Hub.
  • Move to QuickBooks Database Server Manager. If QuickBooks is not already installed on the server, you first need to install it.
  • Now, click Start Scan when you find your company file folders. If it’s not available, browse to the location where the company file is saved and click Start Scan.
  • The QuickBooks Database Server Manager will start repairing firewall permissions automatically. Once the scan is completed, choose Close.
  • Lastly, open QuickBooks on each workstation getting the QuickBooks multi-user mode not working errors like H202. Navigate to File > Switch to multi-user mode. If you are accessing your server computer as a workstation, verify it as well.

Solution 2: Use the QuickBooks File Doctor Tool

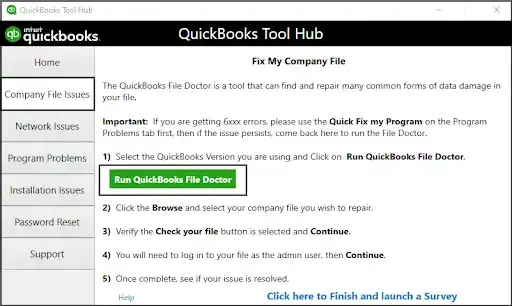
Any damage or corruption in the QuickBooks company file may also trigger a multi-user not working QuickBooks issue. Therefore, to repair the damaged company file, run the QuickBooks File Doctor tool.
Using-QuickBooks-File-Doctor

Solution 3: Review the Services on your server

Note for Full Program option: If you are using full version of QuickBooks on your server computer, enable the multi-user hosting.

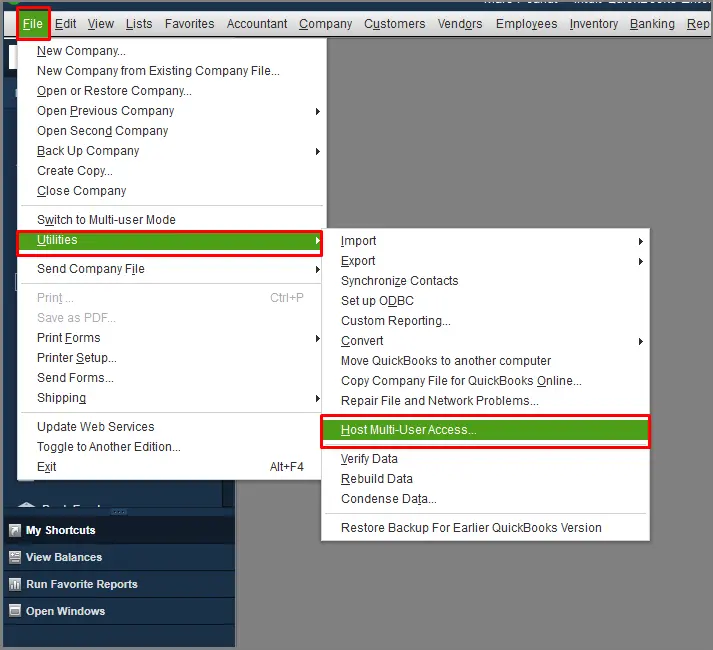
Launch QuickBooks on your server computer. Navigate to File > Utilities option. If you see Host Multi-User Access option, select it. Make sure not to choose the Stop Host Multi-User Access option
Check-Host-Mode-on-each-of-the-User-Computers
  • Open the Start menu on your server computer.
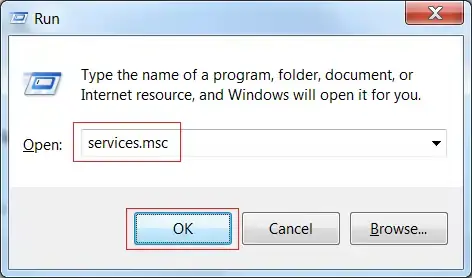
  • Now, type run and then open the Run window.
  • Insert “services.msc” in the text box and press Enter key.
Verify-QuickBooks-Services
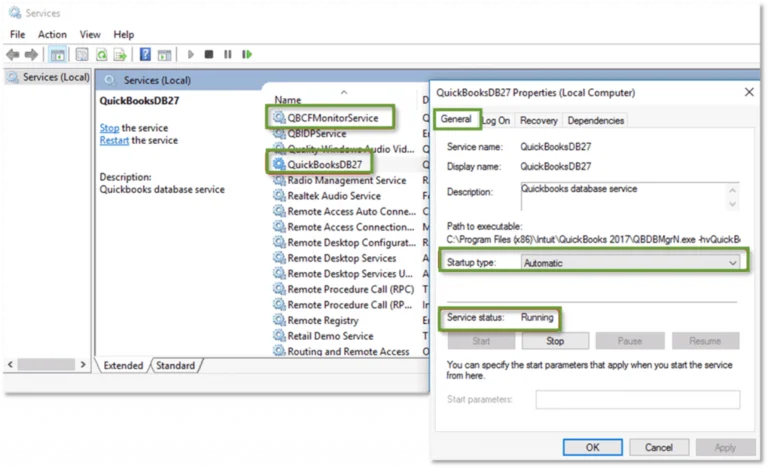
  • Locate and double-tap on QuickBooksDBXX on the list. XX denotes the version of your QuickBooks software. For Example: QuickBooks 2023 is QuickBooksDB33.
  • Choose Automatic as the Startup Type.
  • Configure the following settings:
    • Service Status: Running or started
  • If none of the option is selected, click Start.
Quickbooks-DB-Service
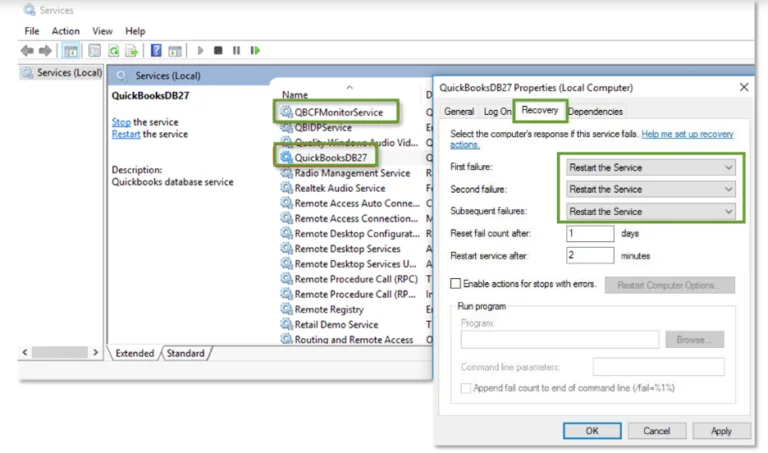
  • Choose the Recovery tab.
  • Now, pick Restart the Service from the following drop-down menus;
    • First Failure
    • Second Failure
    • Subsequent Failure
Quickbooks-DB-Service-Recovery-Tab
  • Hit the Apply option and click OK to save the changes.
  • Now, repeat the same steps to run the QBCFMonitorService.

Furthermore, open QuickBooks on each workstation. Go to File > Switch to Multi-User Mode. If you can easily open the company file in multi-user mode, it means that the problem is fixed.

Solution 4: Set Up Folder & Windows access permissions to share company files

You must have proper Windows access permissions to access the company file in multi-user mode. Insufficient folder permissions to the company file folder may cause the QuickBooks multi-user mode not working H202​ error. So, to set up the folder permissions, use the steps below.

  • Open the Start menu and then open File Explorer.
  • Browse to the company file folder, right-click on it, and choose Properties.
  • Click Advanced when you are on the Security tab.
  • Navigate to QBDataServiceUserXX and click Edit.
  • Confirm that the following settings are configured as Allowed.
    • Traverse Folder/Execute File
    • List Folder/Read Data
    • Read Attributes
    • Read Extended Attributes
    • Create Files/Write Data
    • Create Folders/Append Data
    • Write Attributes
    • Write Extended Attributes
    • Read Permissions

If the folder permissions aren’t configured accurately,

  • Navigate to the company file folder, right-click, and choose Properties.
  • Move to Security > Edit > QBDataServiceUserXX > Full Control > Allow.
  • Select Apply, and then OK to save the changes successfully.

Change the Folder Permissions

To configure your folder permissions,

  • Click the Start menu and open File Explorer.
  • After this, locate and right-click on the following folders;
C:\Program Data\Intuit\Entitlement Client\v8
C:\Program Data\Intuit\Entitlement Client\v6.0
C:\Program Data\Intuit\Entitlement Client\v5
C:\Program Data\Intuit\Entitlement Client\v3
C:\Program Data\Intuit\Entitlement Client
C:\Program Data\Intuit\QuickBooks Enterprise Solutions X.0 (X = version) or C:\Program Data\Intuit\QuickBooks 20XX (XX = year)
C:\Program Data\COMMON FILES\INTUIT
C:\Program Data\COMMON FILES\INTUIT\QUICKBOOKS
C:\Users\Public\Public Documents\Intuit\QuickBooks\FAMXX (XX = year)
C:\Users\Public\Public Documents\Intuit\QuickBooks\Company Files
C:\Users\Public\Public Documents\Intuit\QuickBooks\Sample Company Files\QuickBooks Enterprise Solutions X.0 (X = version) or C:\Users\Public\Public Documents\Intuit\QuickBooks\Sample Company Files\QuickBooks 20XX (XX = year)

Use the following steps for any one of the folders listed below. Remember that you don’t have all of these folders. Some of them are specific to a certain QuickBooks Desktop version.

  • Navigate to your company file folder.
  • Right-click on the folder and click Properties.
  • Choose Everyone from the Security tab.
    • Important Note: If Everyone isn’t mentioned in the Group or User Name checkbox, choose Add. Then, type Everyone and tap on OK.
  • Browse to Full Control > Apply > OK option.

Set Windows access permissions to share company file

Confirm that QuickBooks has enough Windows access permissions to share the company file, which may prevent issues while working with company files over the network.

Windows 10

  • Click the Start menu and launch File Explorer.
  • Find and right-click on the company file folder.
  • Navigate to Properties > Sharing > Share Add.
  • Choose the corresponding QBDataServiceUserXX for your version.
  • Configure the permission level of both users to Full Control and click Share.

Solution 5: Ping your server from a workstation

To test your internet connectivity, you need to ping your server from a workstation. Make sure to ping the server from every workstation that is facing the issue. To enable Network Discovery on your server computer and workstations
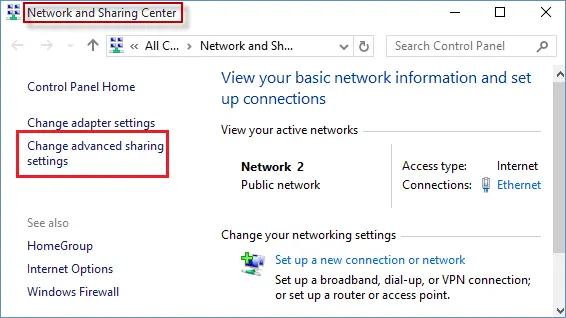
  • Open the Start menu on both your server and your workstations.
  • Type Network in the text box and launch Network and Sharing Center.
  • Choose Change advanced sharing settings.
Change advanced sharing settings
  • Confirm that Turn on network discovery is selected from the Network Discovery and File and printer sharing sections.

Get your server name from your server.
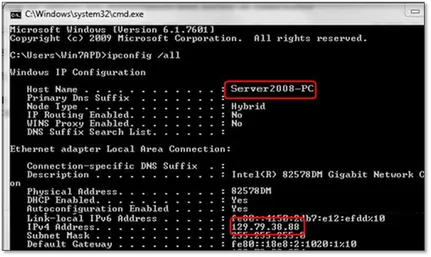
  • On your server computer, open the Start menu.
  • Press the Windows + R keys to launch the Run window.
  • Enter CMD into the Run window to open the Command Prompt window.
  • Now, type ipconfig/all and hit the Enter key.
  • Look for the hostname in the Windows IP Configuration section. You will find the server name written on the right side.
find-the-ip-address-and-computer-name-of-the-server
  • Take a note of the host name, or copy it to a Word document from where you can access it easily.

Return to your workstation to test the server. If you face any problems while performing these steps, contact an IT expert for assistance.

  • Launch the Start menu on your workstation.
  • Type Run in the search box and hit the Enter key.
  • Insert CMD in the Run window to open the Command Prompt window.
  • Type ping[your server name], and hit the Enter key.
  • Repeat the same steps for each workstation that is facing QuickBooks multi-user mode Not Working issues.

If you get a reply for each packet with no loss, it seems like your server is working fine. Otherwise, if you get a packet loss with a slow reply, it means the issue is not resolved. You need to contact an IT expert to get help with your network.

Solution 6: Disable Hosting on all workstations

Confirm that the host multi-user access option is disabled on all your workstations. These are mainly the computers on your network that don’t host your company files. Herein, confirm that your server computer must be the only computer hosting your company file.

  • Launch QuickBooks on any workstation getting the QuickBooks multi-user mode Not Working errors.
  • Avoid opening your company file. Instead, choose the File menu and click Utilities.
  • Confirm that the Host Multi-User access option is not selected. Go to another workstation, and this is the one that’s causing the problem.
  • Click on the Stop Hosting Multi-User Access option.
  • Repeat all the steps on all the workstations that are getting the error.

After verifying your workstations, go to your server computer. This is the system hosting your company file.

  • First, launch the QuickBooks application on your server computer.
  • Browse to the File menu and click Utilities.
  • Choose the Host Multi-User Access option. Avoid selecting the Stop Hosting Multi-User Access option.

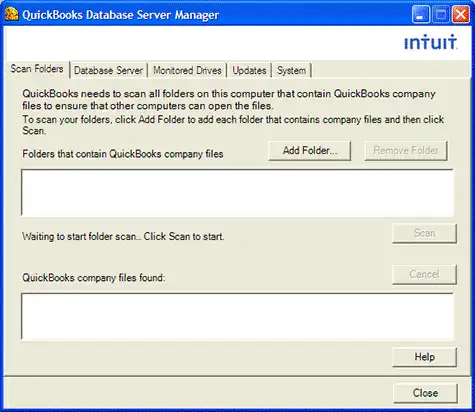
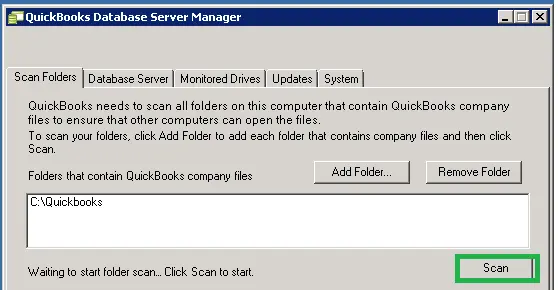
Solution 7: Scan Your Folder Using Database Server Manager

Before sharing your files, you must scan your folders using QBDBMgrN. Make sure to scan these files only once.
  • Click the Start menu on your server computer, the one hosting your company files.
  • Type Database in the search box and open QuickBooks Database Server Manager.
Open-QuickBooks-Database-Server-Manager
  • Navigate to the Scan folders and click Browse.
QuickBooks-Database-Server-Manager
  • Choose the folder containing your company files.
  • Tap OK once the scanning is complete.
  • Once you’re all set, click Start Scan.

After the scanning is complete, the folders will appear in the QuickBooks Company Files Found section. Users on other computers within the same network can then access the company files stored in these folders through QuickBooks.

Solution 8: Configure the Windows Firewall Settings

Ensure that your server computer lets QuickBooks through the firewall installed.

Add Firewall port exceptions for QuickBooks

If you are using multiple versions of QuickBooks Desktop on same computer, use the following steps for each version.
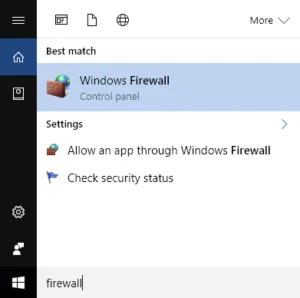
Windows-Firewall-Start-Menu
  • Choose Advanced Settings and right-click Inbound Rules.
  • Click on New Rule > Port > Next.
  • Mark the TCP checkbox.
  • Mention the specific ports required according to your QuickBooks version.
QuickBooks Desktop 2020 and later8019, XXXXX.
QuickBooks Desktop 20198019, XXXXX.
QuickBooks Desktop 20188019, 56728, 55378-55382.
QuickBooks Desktop 20178019, 56727, 55373-55377.

After this, get the dynamic port number. For that, open the QuickBooks Database Server Manager and click the Ports Monitor tab. Look for your QuickBooks version and note down the Port Number.

  • Enter the port number and click Next.
  • Click Allow the Connection and select Next.
  • Confirm that all profiles are selected, then proceed.
  • Now, create a new rule and rename it QBPorts(year).
  • Lastly, click Finish to complete the process.

Repeat the same steps and then create outbound rules. Use all the same steps, except click Outbound Rule on the 4th step.

Create Windows Firewall exceptions for QuickBooks programs

Perform these steps to create Firewall exceptions for each executable on the table.

  • Open the Start menu and then Windows Firewall.
  • Choose Advanced Settings and right-click on Inbound Rules. Then, click New Rule.
  • Go to Program > Next > This Program Path > Browse.
  • Choose any one of the executable files from the table below and click Next.
  • Navigate to Allow the Connection and select Next.
  • Confirm that all the profiles are marked and click Next.
  • Now, create a new rule and rename it QBFirewallException(name.exe).

Repeat all the steps given above and create outbound rules. Perform all these steps, except click Outbound Rules on Step 4.

AutoBackupExe.exeC:\Program Files\Intuit\QUICKBOOKS YEAR
Dbmlsync.exeC:\Program Files\Intuit\QUICKBOOKS YEAR
DBManagerExe.exeC:\Program Files\Intuit\QUICKBOOKS YEAR
FileManagement.exeC:\Program Files\Intuit\QUICKBOOKS YEAR
FileMovementExe.exeC:\Program Files\Intuit\QUICKBOOKS YEAR
QuickBooksMessaging.exeC:\Program Files\Intuit\QUICKBOOKS YEAR
QBW32.exeC:\Program Files\Intuit\QUICKBOOKS YEAR
QBDBMgrN.exeC:\Program Files\Intuit\QUICKBOOKS YEAR
QBServerUtilityMgr.exeC:\Program Files\Common Files\Intuit\QuickBooks
QBCFMonitorService.exeC:\Program Files\Common Files\Intuit\QuickBooks
QBLaunch.exeC:\Program Files\Common Files\Intuit\QuickBooks
QBUpdate.exeC:\Program Files\Common Files\Intuit\QuickBooks\QBUpdate
IntuitSyncManager.exeC:\Program Files\Common Files\Intuit\Sync
OnlineBackup.exeC:\Program Files\QuickBooks Online Backup

Conclusion

By now, we hope that you can easily resolve the QuickBooks multi-user mode not working error and restore multi-user access. To prevent the issue, ensure hosting settings are correct, QuickBooks Database Server Manager is running accurately, test the internet connection, and run the QuickBooks File Doctor tool. If the issue still persists, connect with our QuickBooks Data Service team experts for better guidance +1(888)-718-7888.

Frequently Asked Questions (FAQ’s)

To fix the issue, verify that hosting is enabled only on the server, restarting the QuickBooks Database Server Manager, and running the QuickBooks File Doctor tool. Also, review your firewall and network settings.

QuickBooks Error H202 occurs when QuickBooks cannot communicate with the server hosting the company file. It is caused by firewall restrictions, incorrect hosting settings, or network configuration issues.

Before fixing QuickBooks multi-user issues, back up your company file, ensure all users are connected to the same network, and ensure that the server is running the latest QuickBooks updates. This helps prevent data loss during troubleshooting.

To open QuickBooks forcefully in multi-user mode, open the company file, select File, and choose Switch to Multi-User Mode. If the option doesn’t work, verify your hosting configuration and restart the required QuickBooks services.

Install QuickBooks Database Server Manager on the server, store the company file in a shared folder, enable hosting on the server, and grant proper folder permissions for all authorized users.

Yes. QuickBooks Enterprise is designed to support more simultaneous users, larger company files, and improved performance in multi-user environments compared to Pro and Premier.


About The Author

Steven Moody

Steven Moody is a bookkeeping and payroll specialist dedicated to helping businesses maintain accurate financial records and efficient payroll operations. His expertise includes payroll management, tax compliance, bookkeeping solutions, and financial reporting. Steven regularly shares insights on accounting best practices and business finance strategies. Outside of work, he enjoys traveling, exploring new places, and keeping up with the latest developments in business technology.

Steven Moody

QuickBooks Desktop

How to Reset QuickBooks Password: Admin & User Login

Read More
QuickBooks

How to Restore QuickBooks Backup File Without Errors?    

Read More
QuickBooks Error

QuickBooks Missing PDF Component? How to Fix It Now

Read More
QuickBooks Error

QuickBooks Error 1920: Why It Happens and How to Fix It

Read More
QuickBooks Error

QuickBooks Error PS032: Payroll Update Failed? How to Fix It

Read More