QuickBooks Desktop is a popular accounting software for businesses that prefer managing their financial data on a local computer. However, as companies grow and remote work becomes more common, many users are now looking for ways to migrate from QuickBooks Desktop to Online for a more flexible and accessible accounting experience.
QuickBooks Online allows users to access their financial data from anywhere, collaborate easily with accountants and team members, and manage their books without depending on a single computer for company file access.
This detailed guide will explain everything you need to know about migrate from QuickBooks Desktop to Online smoothly.
Migrate from QuickBooks Desktop to Online means transferring your existing company data from the desktop version to the cloud-based QuickBooks Online platform. Instead of creating a new company file and entering information manually, the migration process allows you to move important accounting records to continue your work online.
During the migration, QuickBooks can transfer essential data and other financial records. Before moving your company file, you should prepare your QuickBooks Desktop data, create a backup, and verify that your company file is ready for transfer.
Proper preparation helps you reduce the chances of missing information or facing issues during the migration.
Many businesses are choosing to migrate from QuickBooks Desktop to Online because they want a simpler way to manage their accounting data. QuickBooks Online offers more flexibility, especially for businesses that need access to their financial information from different locations.
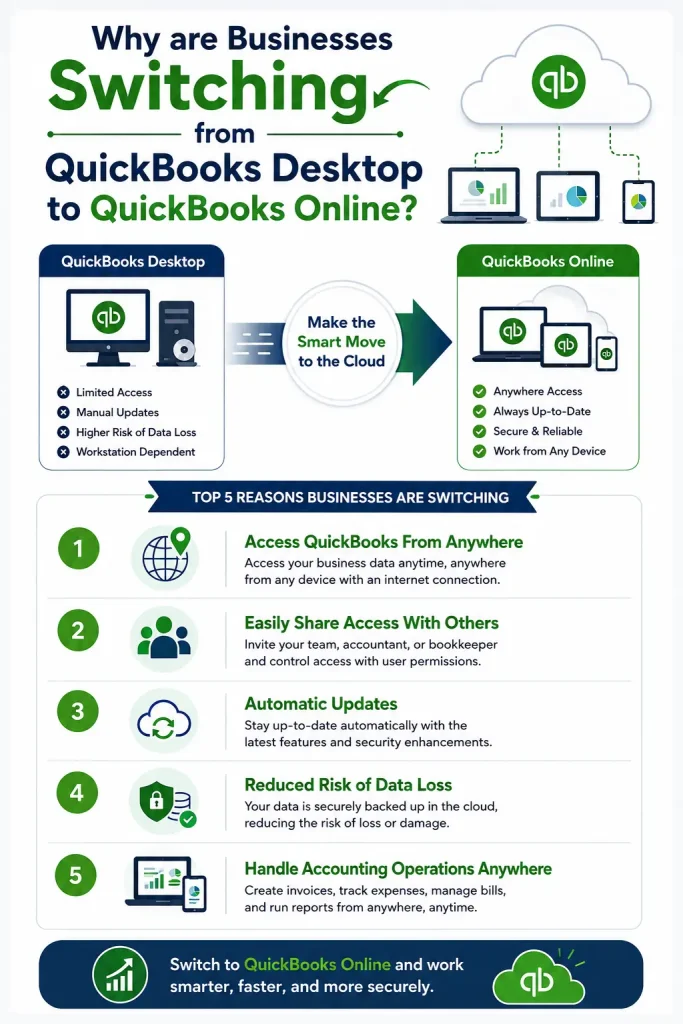
Here are some common reasons why users are switching to QuickBooks Online:
When you switch to QuickBooks Online, you are not limited to one computer. You can sign in from any device with an internet connection and check your financial records whenever needed. This is especially helpful for business owners and accountants who work remotely.
QuickBooks Online makes it easier to work with accountants, employees, or business partners. Instead of sending company file backups, you can give authorized users access to the same company file and work together in real time.
QuickBooks Online updates automatically, so you do not have to manually download and install new versions. This helps ensure that you always have access to the latest features and improvements.
QuickBooks Online stores your business data in the cloud, you do not have to depend only on your computer storage. This can help protect your accounting information if your system faces unexpected problems.
QuickBooks Online allows their users to manage accounting tasks even when you are travelling. You can easily check your reports, review the transactions, create invoices, and handle expenses with stable internet connection and supported devices.
Switching from QuickBooks Desktop to QuickBooks Online can make accounting more convenient, especially for businesses that need flexibility, remote access, and easier collaboration.
Before starting the process to migrate from QuickBooks Desktop to Online, it is important to prepare your QuickBooks Desktop company file. A little preparation can help prevent missing data, migration errors, or problems after moving your information to QuickBooks Online.
Here are some essential things to check before you begin:
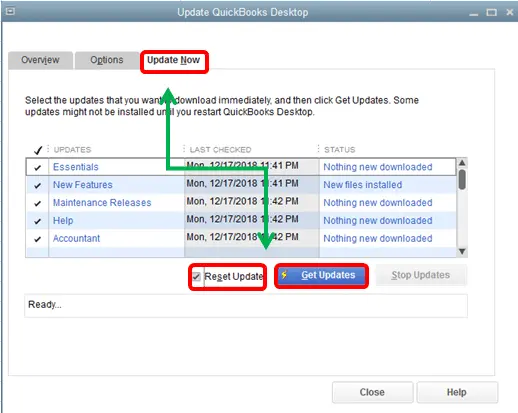
Ensure your QuickBooks Desktop is updated with the latest available version. By using the outdated version can cause compatibility issues during the migration process.
Always create a backup of your QuickBooks Desktop company file before starting the migration. This gives you a safe copy of your data in case something goes wrong during the transfer.
Before moving your data, review your company file and make sure everything is accurate. Check your account balances, customer records, vendor information, and other important details.
It is also a good time to clean up old or unnecessary data that you no longer need.
It’s also recommended to Verify and Rebuild Data in QuickBooks Desktop before migrating. This helps detect and repair data issues that could interrupt the export process.
Make sure you have an active QuickBooks Online account before starting the migration. You will need to sign in with your Intuit account to transfer your company data. If your QuickBooks subscription has expired, renew it before starting the migration. An inactive account may prevent you from exporting your company file.
Large company files with a high number of transactions may take more time to migrate. Checking your file size beforehand can help you understand the expected migration time.
Make sure you can access your QuickBooks Desktop company file with administrator permissions. Some migration steps require admin-level access to move your data successfully.
Taking these steps before migration can make the process smoother and reduce the chances of facing issues while migrate from QuickBooks Desktop to Online.
Before migrate from QuickBooks Desktop to Online, it is important to understand what information will be transferred from your Desktop company file.
QuickBooks can transfer many important parts of your company file; look at the points below:
Basic company details such as your company name, contact information, and accounting settings can be transferred during the migration process.
Your customer and vendor records can move to QuickBooks Online, including important information needed for creating invoices, tracking payments, and managing business relationships.
Your existing chart of accounts, including income, expense, asset, and liability accounts, can be transferred so you do not have to recreate them manually.
Information about your products and services can also move to QuickBooks Online. This includes items you use for creating invoices and tracking sales.
Depending on your QuickBooks version and company file compatibility, important transactions may transfer, including:
Some financial reports and account balances can transfer to QuickBooks Online. After migration, it is recommended to review your reports and compare them with your previous Desktop records.
Once you’ve reviewed what data will transfer, you’re ready to begin the migration. Before you start, make sure you’ve backed up your company file and are signed in to QuickBooks Desktop as the company administrator.
Switching from QuickBooks Desktop to Online needs proper preparation and following the correct steps to ensure your financial data moves safely without errors. Follow these steps to migrate from QuickBooks Desktop to Online:
Using the latest version of QuickBooks Desktop helps avoid compatibility issues during migration.
Note: If your company file doesn’t open, resolve the QuickBooks Won’t Open issue first and then continue with the migration.
After opening the company file, you can start exporting your data to QuickBooks Online.
QuickBooks will now guide you through the migration wizard. Follow the on-screen instructions to proceed with the Export.
The next step is to connect your QuickBooks Desktop file with your QuickBooks Online company.
Take a moment to verify that you’ve selected the correct company. Importing data into the wrong QuickBooks Online account may require creating a new company and repeating the migration process.
If your QuickBooks Desktop company file includes inventory, QuickBooks will ask whether you want to bring your inventory information into QuickBooks Online.
You should review the inventory reports once the transfer is complete.
Before exporting your data, QuickBooks will display a summary of your migration settings.
Review the information carefully and make sure everything is accurate. Once you’re ready:
The migration process may take a few minutes to several hours, depending on the size of your company file and the amount of data being transferred. During this time, avoid making changes to your QuickBooks Desktop company file until the migration is complete.
Now, QuickBooks will securely upload your company data to QuickBooks Online in the background. You don’t need to keep working in the company file while the Export is in progress.
Once the migration is successfully completed, you’ll receive a confirmation email from Intuit. You can then sign in to QuickBooks Online and begin reviewing your imported company data.
Successfully migrate from QuickBooks Desktop to online is the first step. Before using QuickBooks Online for your daily accounting, it’s essential to verify that your financial information has transferred correctly.
Here are a few recommended checks after the migration process:
First, generate key financial reports in both QuickBooks Desktop and QuickBooks Online, such as:
Compare the reports to ensure account balances and financial figures match.
Review your customer and vendor lists to confirm that contact details, payment terms, open balances, and transaction history have transferred correctly.
Open the Chart of Accounts in QuickBooks Online and verify that all accounts, account types, and opening balances are accurate.
Review unpaid invoices, bills, sales receipts, purchase orders, and other outstanding transactions to make sure nothing is missing.
Before fully switching to QuickBooks Online, create a sample invoice, record a payment, and run a few reports. This will help you confirm that everything is functioning properly before you resume your regular accounting activities.
Although the process of migrate from QuickBooks Desktop to Online is simple, but users often encounter errors or unexpected issues. Most of these problems can be resolved with a few simple checks.
Large company files that contain years of transactions may take longer to migrate. Here’s how to fix:
You can review the company file size, remove unnecessary data if appropriate, and ensure your QuickBooks Desktop version supports migration.
Some users are unable to find the Export company file to QuickBooks Online option.
Look at the possible solutions:
Login issues can interrupt your migration process. Here are some easy solutions that can help you fix this:
You can verify your Intuit account credentials, confirm your QuickBooks Online subscription is active, and try signing in directly before restarting the migration, If you’ve forgotten your login credentials, you can Reset QuickBooks Password before signing in to your QuickBooks Online account.
Following a few best practices can help reduce the chances of errors and make the transition much smoother.
Choosing the right accounting platform can help you improve the way to manage your business finances and streamline your bookkeeping tasks. If you’re planning to migrate from QuickBooks Desktop to Online, preparing the company file and following the correct migration steps will help you ensure a smooth transition.
With the flexibility of cloud based access, automatic updates, and real-time collaboration, QuickBooks offers a more convenient way to handle accounting operations. Some users upgrade their computer before migrating to QuickBooks Online. If you’re one of them, our Move QuickBooks to New Computer guide will help you transfer your company file safely. If you need professional guidance on the migration process, you can contact the Data Service Team live representatives at +1(888)-718-7888.
QuickBooks Desktop is installed on a computer, while QuickBooks Online is a cloud-based solution that allows access from anywhere. Online also makes collaboration and automatic updates easier.
The easiest way is to use the built-in migration option in QuickBooks Desktop. Simply update your software, back up your file, and follow the guided transfer process.
Migration process time depends on your company file size, data volume, and internet speed. Small files may transfer quickly, while larger files can take several hours.
After 60 days, migration options may depend on your QuickBooks Online subscription and account settings. You may need to use available import methods or contact QuickBooks Support for assistance.
If the migration process gets interrupted, your QuickBooks Desktop file remains unchanged. Check your internet connection, verify your company file, and restart the migration process.
Some data, such as audit history, custom templates, memorized reports, and certain payroll details, may not transfer. These items may require manual setup after migration.